Ι The Box Turtles Project Ι The Ephemeral Pools Project Ι The Lizards Project Ι The Snakes Project Ι The Stream Amphibians Project Ι
Amazing Aquatic Turtles
Before starting a project similar to the one described in this curriculum, contact your state wildlife agency to see what kinds of permits you need to work with aquatic turtles. Please note, our project does not include sea turtles (marine turtles). Box turtles (terrestrial turtles) are the subject of a different The HERP Project curriculum. Indeed, most of the turtles that are described in this curriculum could be described either as aquatic or semi-aquatic, as they spend part of their time on land. Both terms will be used interchangeably in this curriculum.
This curriculum, developed by The HERP Project (Herpetology Education in Rural Places and Spaces), is a description of how leaders of formal or informal outdoor learning experiences can teach about semi-aquatic turtles by conducting a mark recapture study using aquatic turtle hoop traps.
Semi-aquatic turtles live in lakes, ponds, streams, rivers, and estuaries in North Carolina. Most semi-aquatic turtles are omnivorous and can be caught in baited hoop traps. We have also used basking traps but this curriculum focuses solely on our use of hoop traps. There are a small number of semi-aquatic turtle species in the areas of the state in which we conduct our project and so it is relatively easy to identify the species that we do catch.
Methods about how to record and submit site and turtle data to The HERP Project are provided. We describe how aquatic turtle hoop traps are baited and set in bodies of water such as lakes, ponds, or rivers. Within 24 hours, traps are checked, turtles removed, data are collected, and animals are released at point of capture. This curriculum provides a description of how to teach participants about local semi-aquatic turtle populations and the scientific procedures and ways of thinking associated with a biological inventory.
![]()
![]()
![]()
![]()
This curriculum, developed by The HERP Project (Herpetology Education in Rural Places and Spaces), is a description of how leaders of formal or informal outdoor learning experiences can teach about semi-aquatic turtles by conducting a mark recapture study using aquatic turtle hoop traps.
Semi-aquatic turtles live in lakes, ponds, streams, rivers, and estuaries in North Carolina. Most semi-aquatic turtles are omnivorous and can be caught in baited hoop traps. We have also used basking traps but this curriculum focuses solely on our use of hoop traps. There are a small number of semi-aquatic turtle species in the areas of the state in which we conduct our project and so it is relatively easy to identify the species that we do catch.
Methods about how to record and submit site and turtle data to The HERP Project are provided. We describe how aquatic turtle hoop traps are baited and set in bodies of water such as lakes, ponds, or rivers. Within 24 hours, traps are checked, turtles removed, data are collected, and animals are released at point of capture. This curriculum provides a description of how to teach participants about local semi-aquatic turtle populations and the scientific procedures and ways of thinking associated with a biological inventory.
Central to our program’s success is the inquiry method of learning and teaching. Our programs include discussions, rather than presentations that require participants to sit quietly and listen. A successful discussion has participants asking and answering questions. Don’t worry about wrong answers. There will be time to address misconceptions. Participants begin with the inquiry question “What types of turtles are found in this body of water?” From this starting point, they may develop other questions, such as “What parts of the body of water do turtles prefer?” or “What types of bait work best?” or “What is the effect of camouflage on trapping efficiency?” Assuming that the leader has the background knowledge, we also suggest addressing the following points, which have been important aspects of our approach to teaching:
- Share natural history information about the aquatic turtle species common in the area.
- Lead a discussion about the ecological role of turtles and the pressures that some turtle populations are facing. For example, commercial trade is responsible for many turtles being taken out of the wild for use as pets, food, or medicine. An internet search for “Asian turtle trade” will bring up a variety of reports and news publications about the issues of turtles in the food trade. Another pressure is road mortality. Many semi-aquatic turtles move across roads during breeding seasons and can be hit by cars.
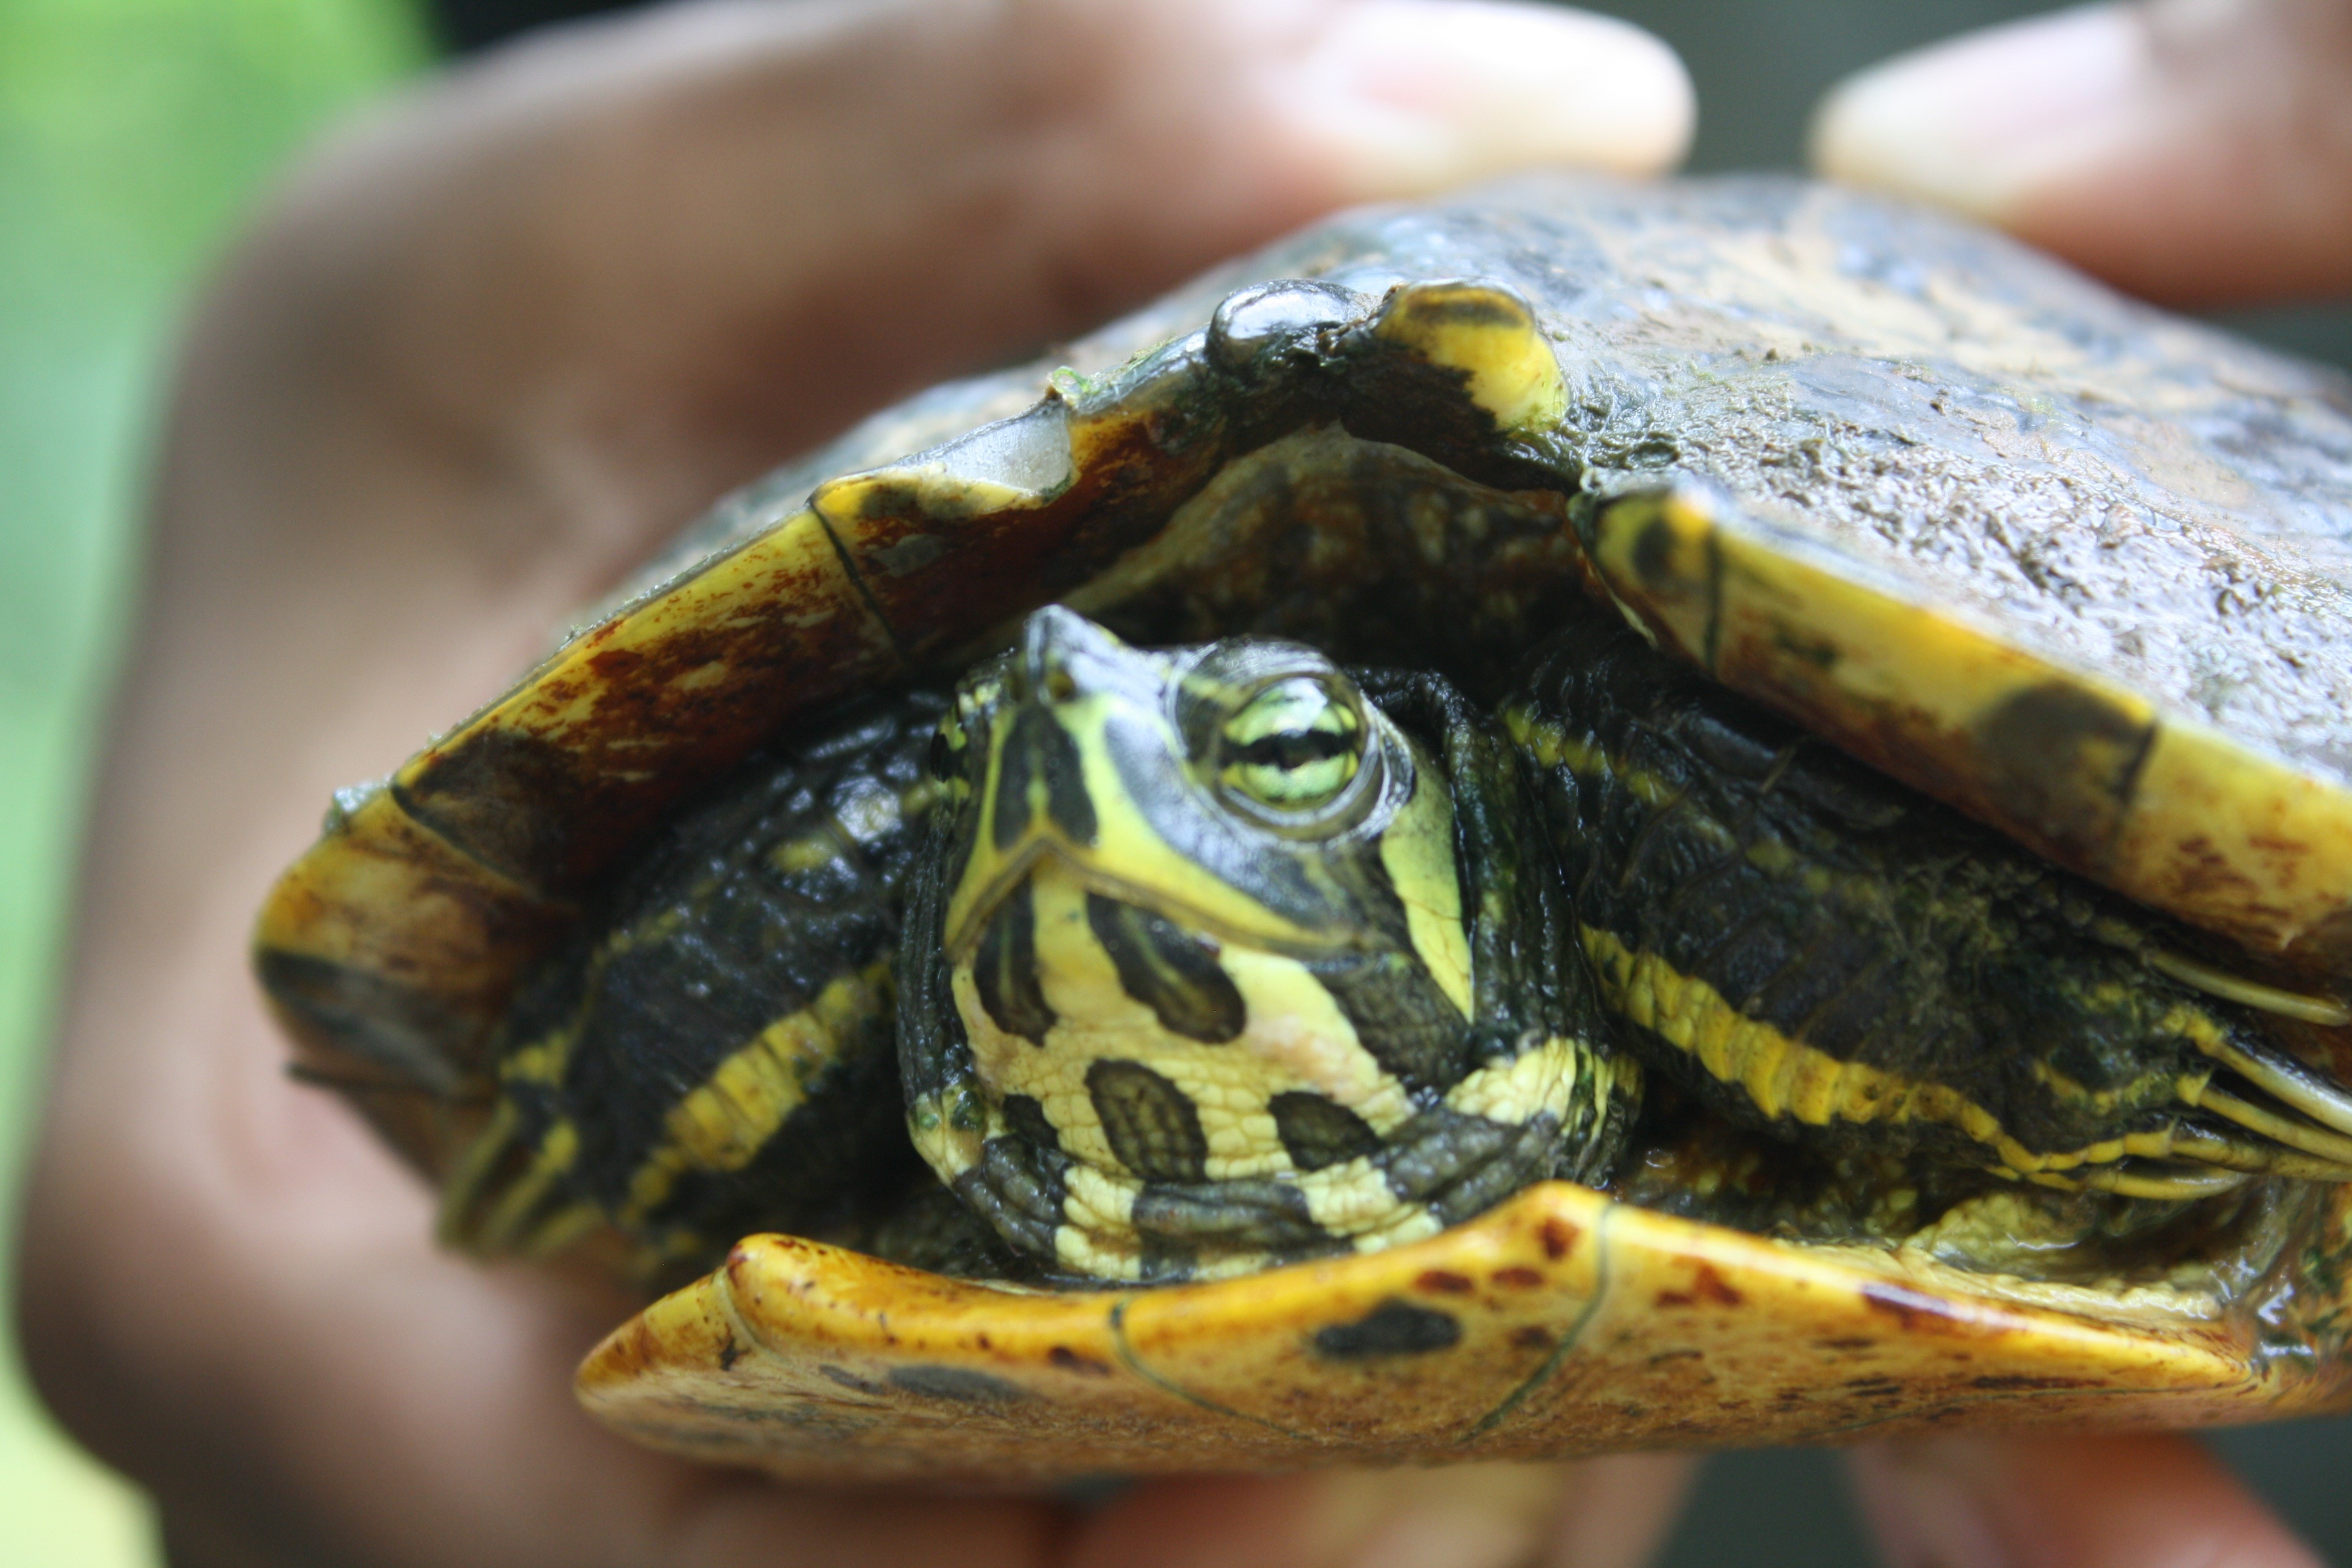
- Describe situations related to non-native species. Non-native species sold as pets often get released into the wild by pet owners who have decided they can no longer care for them. For example, in our area, the Red-eared Slider is not a native turtle but people who had them as pets have released them into the natural environment. They are a subspecies of our Yellow-bellied Slider and the populations have been interbreeding with unknown repercussions.
After completing this project, participants will be able to:
- Engage in inquiry investigations and conduct biological inventories demonstrating an understanding of the nature of science
- Demonstrate techniques to safely catch, handle, house (if need be) and release aquatic turtles
- Demonstrate and explain the appropriate use of equipment (hoop traps) and measurement tools
- Describe the threats to aquatic environments (lakes, streams, ephemeral pools, and other wetlands) and their semi-aquatic turtle inhabitants
- Identify semi-aquatic turtles that frequent North Carolina Piedmont lakes and streams. List and describe several local species of semi-aquatic turtles (e.g. Yellow-bellied Sliders, Painted Turtles, and Musk, Mud, and Common Snapping Turtles)
- Explain the life cycle of semi-aquatic turtles
- Explain the environmental pressures on local and global semi-aquatic turtle populations
- Report data to a reliable and dedicated citizen science database

Instructors should know characteristics of reptiles in general and turtles in particular. They should know general information about turtle anatomy and physiology. They should be familiar with local species, their habitat preferences, and distinguishing characteristics of each species of semi-aquatic turtle. The instructor should also be able to use a field guide and a classification key to identify local species.
Instructors should familiarize themselves with the local environment where trapping will occur so that they know the depth of the body of water and the currents (if any) of the body of water where they will be trapping. Instructors should feel comfortable in the water in waders and be able to swim.
It is important for curriculum project leaders to use an inquiry method of instruction and to make sure that students have adequate amounts of time to ask and answer questions, to collect, record and report data and to contribute to the project in ways in which they are interested.
- Hoop traps with bait buckets, a floating device (like a capped plastic gallon jug of air), and rope to tie the trap to an object (like a tree trunk) on the bank of the body of water. Hoop traps can be purchased treated (with an oil-based product that extends the life of the trap) or untreated. Hoop nets with hoops and nets of various sizes and meshes can be purchased. We usually use 2.5 feet hoop traps with 1.5-inch mesh
- Turtle shells (or simulated ones created from Styrofoam bowls—Appendix B)
- Turtle replicas (optional)
- Data sheets (Appendix A)
- Clipboards
- Field guides
- Waders (chest waders are recommended but hip waders might be useful)
- Heavy leather or rubber gloves to protect hands from scratches or bites
- Large storage containers, such as 10-gallon plastic buckets or large plastic empty clean kitty litter containers, to hold animals removed from traps
- Calipers
- Spring scales or digital pan scales
- Thermometer
- Bait of choice (canned sardines packed in water, hotdogs and chicken parts)
- GPS (or a GPS app on a phone)
While doing fieldwork in North Carolina, participants may encounter chiggers, yellow jackets, ticks, and spiders. Using insect repellant (but not on hands if participants plan to handle herps) and wearing a hat and long pants are useful ways of preventing these animals from biting, stinging, or attaching. Clothes can be pre-treated with insect repellant (such as Permethrin) instead of applying insect repellant to the skin. Pulling socks over the bottoms of pants legs is an especially good way of preventing ticks, chiggers, and spiders from crawling up legs.
Participants should engage in safe fieldwork practices. Sunscreen is recommended even for those with dark skin. In hot weather, carry drinking water and make sure participants are well hydrated; ask them to stop and drink water at regular intervals to help prevent heat stroke or other complications. Sturdy boots are useful when hiking in rough or overgrown terrain. Look before you step. Wear protective footwear (such as rubber work boots to cover calves), long pants, gloves (such as leather gloves), and look before placing hands down or around a tree. Always hike with a partner and let someone else know the itinerary.
Care should be taken when working around water if participants are inexperienced swimmers. Leaders should be mindful of the dangers associated with aquatic reptiles and amphibians. Certain amphibians and invertebrates can deliver a bite or pinch; first-timers not familiar with these organisms may choose to wear heavy gloves. Upon return from the field, all individuals should wash their hands immediately. In the unusual event of a serious bite or sting, medical assistance should be sought immediately even if it means termination of the activity. If participants are new to fieldwork, they may be more comfortable wearing boots, waders, and gloves to handle animals.
Instruct participants in the safe use of materials. If participants are wearing waders (waterproof overalls with boots connected), make sure to explain why they would never enter water deeper than the top of the overalls, so that the overalls do not fill with water and weigh them down and make them sink. The safe and proper use of equipment protects participants and organisms.
Many semi-aquatic turtles will bite and scratch. Suggestions are provided under “Animal Handling Guidelines” to minimize the risk of bites and scratches. Participants may choose to wear heavy gloves. Participants should wash their hands immediately after handling turtles or after being in the field (“in the field” means being outside in an area that might contain the organisms being studied), whether or not anyone has been bitten or scratched. If bitten or scratched, wipe the area with antiseptic. Finally, leaders should be mindful of the dangers associated with other types of aquatic reptiles (snakes and alligators) that frequent areas where turtles can be found.
Instructors should know how to identify local snakes and be aware that participants will take behavioral cues from leaders when encountering other types of wildlife. Project Leaders should be respectful of snakes and display a calm demeanor when encountering them.
When handling any live animal, it is important to keep two safety issues in mind: the safety of the person who is searching for or holding the animal and the safety and welfare of the animal itself. The humane treatment of wild turtles in field research is both an ethical and a scientific necessity. Turtles are extremely vulnerable to stress and pain caused by improper handling and confinement. It is of particular importance that captured animals be returned unharmed to the exact place where they were captured so they can resume their normal activities and that habitat essential for these activities not be damaged in the course of capture efforts.
This curriculum describes the use of hoop traps to catch semi-aquatic turtles. The interval between setting traps and checking traps should be as short as possible, never more than 24 hours. Lead instructors/investigators must make every effort to prevent trap deaths from exposure or drowning. Traps must have a flotation device so that turtles have access to air. We put a capped half gallon or gallon container of air (such as empty milk jugs or liter bottles) in each hoop trap and check to make sure that each trap floats on the surface of the water before we leave the area.
Although turtles do not have teeth, they have strong, powerful mouths. Any turtle can bite and will likely scratch with their toenails. Be prepared to be bitten or scratched. Keep the turtle’s head aimed away so it cannot latch onto participants. Never place hands in front of the turtle’s face or even close to its head. Never taunt a turtle by placing anything near its mouth to watch it bite. Remember, some turtles have very long necks and can reach around to bite.
Pick up small turtles by holding the whole shell between both hands, keeping fingers away from the mouth. Grip the carapace (top shell) on both sides in front of the hind legs with thumbs on the carapace and fingers on the plastron (bottom shell). Musk and snapping turtles are able to extend their heads great distances. Be careful to keep fingers near the rear of the turtle and away from claws.
In the case of larger turtles, placing a dark cloth over the eyes of many turtles calms them. Large snapping turtles should NOT be handled.
Keep all turtles out of the direct sun so they will not dry out or overheat. Reptiles are ectotherms, meaning they derive body heat from external sources. Usually they avoid overheating in their natural environments by immersing themselves in water, burrowing in the soil, or seeking refuge under leaf litter. Try not to hold them for too long. A small animal’s body temperature on a cold day can rise way above normal simply by absorbing heat from participants. The best way to avoid stress from heat or water loss is to restrain the animals minimally trying not to alter their environmental conditions too much. Collect measurement information quickly but accurately.
Return turtles to their natural habitats as soon as possible. Because turtles have homes and preferred territories, it is important to return each animal to the exact place where they were found.
In general, remember that
- All animals must be released at the point of capture
- Almost all reptiles and amphibians can bite. Some never do, and some do so reliably. Know the species of each animal being handled!
- Hands should be washed after handling animals
- When turtles try to “swim” in the air, they are probably stressed. Respect the natural inclinations of these ancient creatures and handle them near ground level. Dropping a turtle from even a few feet may harm them
- Never try to get a turtle to bite down on anything (pencil, stick, etc.)

Hold turtles with both hands.
What We Know, Don’t Know, and Want to Know About Semi-aquatic Turtles
All of our curriculum projects begin by asking participants questions and engaging in discussion. We ask participants to share their experiences with and knowledge about turtles. We encourage participants to think broadly. For example, we ask them to describe actual experiences with wild turtles, seeing turtles on television or at an aquarium, reading stories about turtles, having turtles as pets, or even stories about people who eat turtles. This conversation should reveal what they know and do not know about turtles, their interests in turtles and their misconceptions about turtles. We suggest that instructors value all responses and not be critical or judgmental about any of the stories shared. This conversation provides instructors with a place to start the semi-aquatic turtles curriculum.
You can help to focus student thinking by asking, “What are the differences between terrestrial, aquatic, and semi-aquatic turtles?” Possible answers include
- Terrestrial turtles spend their lives on land.
- Aquatic turtles have shells that have highly hydrodynamic shapes. They spend most of their lives in the water (e.g. soft shelled turtles, sea turtles), except under special circumstances, like when they lay eggs.
- Semi-aquatic turtles live most of their lives in the water but, in some cases, can spend considerable time on land. Their shells are sometimes more boxy-shaped than aquatic turtles, though there are many exceptions.
Since turtles are reptiles, leaders can also ask about and then discuss the defining features of reptiles:
- Drier skin (than amphibians) with scales
- Internal fertilization
- Leathery shelled eggs that are laid on land
- Lung breathers
Once students are engaged in the process of learning more about semi-aquatic turtles, they can examine the similarities and differences among turtle shells.
External Anatomy of Turtles
Provide students with sample turtle shells, replicas, or homemade Styrofoam shells (see Appendix B for directions on how to make these). Teach participants basic anatomical features of the shells, and have them identify features on their own shell. Have them study turtle shells and make sketches in their notebooks. Remind them of the importance of accuracy.
The shell of the turtle is made up of bony plates. A scute is the keratinized material that covers each bony plate. The scutes continually peel off the shell. Have each participant find the cervical scute (the cervical scute is the small scute right over the neck of a turtle, which separates the turtle into left and right sides). Then, have participants count the vertebral scutes on the turtle shell that they are holding. Most turtles have five vertebral scutes but there is some variation. Next, have students count the marginal scutes, checking themselves in various ways (by starting with the cervical scute and going right, then starting with the cervical scute and going left and then counting marginal scutes on each half of the shell from head to tail. Usually, turtles have 24 marginal scutes; 12 on each side, but again, this is variable.
Have participants label their turtle shell sketches with features such as marginal scutes, vertebral scutes, lateral or pleural scutes, and cervical scute (on the carapace), and the names of the various plates on the plastron (if this much detailed is desired). It is good to locate at least the gular scutes on the plastron as these are useful in turtle identification.
Video Parts of the Turtle Shell: http://vimeo.com/109017644
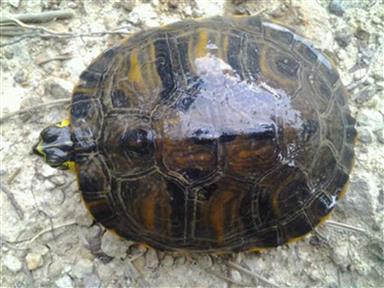
The carapace of a Florida cooter
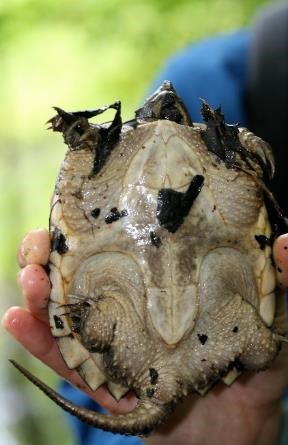
Common Snapping turtle plastron
Classroom Studies
If beginning in the classroom, have students locate information about the types of semi-aquatic turtles that are common in their area. Field guides or internet sites will be useful. When the guides or websites include range maps, participants could generate their own list of species that might likely be found in the study area. Students should focus on determining at least three or four physical characteristics that can be used to distinguish each turtle species.
Setting Traps
Once turtle shell activities have been completed, students can begin the process of checking turtle traps that were set the night before. Instructors can set the traps or participants can be involved in the trap setting process. Instructors typically set traps the first night of our program, and students are involved in re-baiting and re-setting traps on future days of the program.
We typically bait traps with canned sardines packed in water. Bait holders (bait buckets) are made for each trap to hold the partially opened can of sardines out of reach of the captured turtles. This allows some of the bait to remain unconsumed so the trap will continue catching turtles. Bait buckets can be hung anywhere in the trap but should be under water once the trap is set. Each trap also needs to have empty (air-filled) sealed containers to make sure there is no danger of the trap sinking. We cut pieces of PVC pipe to hold the traps open and tie the end of the trap to a solid object such as a tree trunk or dock post. Traps are typically placed near areas where turtles bask, but participants may suggest other placements for experimental purposes. It is important to indicate on a map or sketch of the area where traps are located and how they are numbered (in a clockwise or counterclockwise sequence).
Lift trap from both ends to check for captures.
Checking Traps
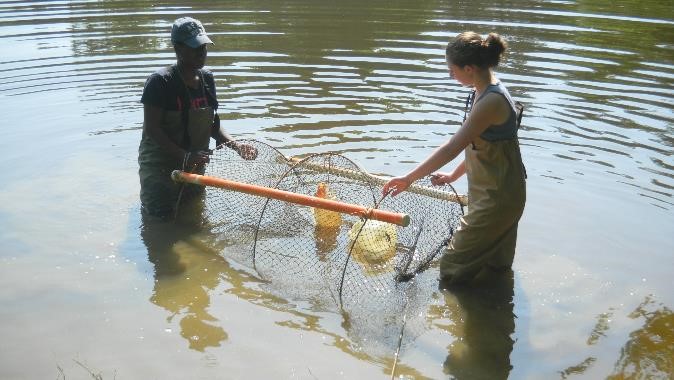
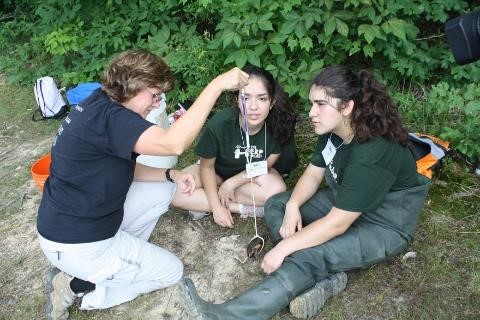
Students select and put on waders based on shoe size. Two or three participants can work together to remove traps from the water. Two students should walk to either side of the trap and lift the trap by the metal hoops, not by the PVC pipes which are structural components. If picked up by the PVC pipes, the trap could collapse and the PVC pipes fall out and sink. The two students carefully walk with the trap back to the shoreline. The third person can pull the rope that is tied to the trap.
The group should survey the animals that are in the trap before removing anything. Smaller turtles can be removed by reaching into the throat of the trap and pulling them out, posterior end first. Keep hands away from turtles’ mouths and claws. Other participants should be prepared to take the turtles that are being removed from the trap. If a large collection container (like a 10-gallon bucket) is available, turtles can be placed in this. For large turtles, such as snapping turtles, it may be necessary to untie the end of the trap that was previously tied to the stationary object. Once this end of the trap is open, fold back the net and place the trap near the water’s edge so that the turtle can walk out on its own. This is safer for people and for the turtle. In our project, we do not handle large snapping turtles. Sometimes traps will catch other animals such as fish. Reach into the throat of the trap and remove fish and return them to the water.

Students retrieving turtles from the hoop trap
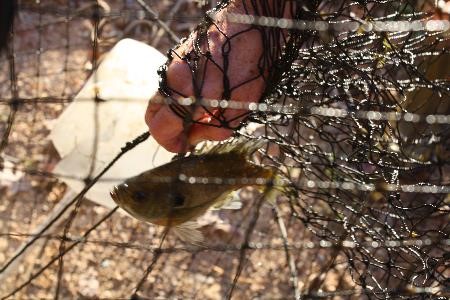
A fish caught in the hoop trap
Video Trapping Turtles in a Hoop Trap: http://vimeo.com/109018471
Identifying Turtles in the Field
If there are multiple turtles in the trap, students can work in pairs to identify their assigned turtle. Students may create a dichotomous key for turtles or use their field guide, looking at pictures and reading the text and then comparing the information in the text to the turtle in their possession. We ask students to provide a minimum of three field characteristics to identify a turtle. A learner may say that their turtle is a Yellow-bellied Slider (Trachemys scripta) because it has yellow on its belly, but this could describe multiple turtles in our area, so we ask them for a second distinguishing characteristic. They may then say that the turtle has yellow stripes on its leg. This still describes multiple local turtles, so we ask for a third characteristic. They may finally refer to a yellow blotch or bar behind the eye linking a pair of yellow stripes on each side of the neck. Only after giving three field characteristics do we allow a student group to arrive at an identification. We might also ask for a fourth characteristic (pair of dark spots on the gular scutes) just to be sure.
Some of the more common turtles where we conduct our project include
- Eastern Mud Turtle (Kinosternon subrubrum)—no distinct head stripes, double hinged plastron, pectoral scutes meet only narrowly on the midline of the plastron forming a triangle
- Eastern Musk Turtle (Sternotherus odoratus)—also commonly called the stinkpot, from the odor it releases, two pairs of barbels on the chin and throat, single, weakly hinged plastron, pectoral scutes rectangular in shape, light yellowish line above and below the eye
- Common Snapping Turtle (Chelydra serpentine)—large head, long and tapering tail armed above with large scales, small cross-shaped plastron, carapace with three longitudinal keels (more prominent in young turtles) (If large snapping turtles are caught in a trap, they should never be handled or removed by students. See suggestions above for how to safely release these large animals)
- Painted Turtle (Chrysemys picta)—pale transverse seams between the dorsal scutes, two yellow spots in line behind the eye, conspicuous red markings around the edges of the shell, legs with red and yellow stripes
Once participants have identified the turtle to species, we ask them to attempt to determine if the turtle is male, female, or too young to tell. Again, students will need to go back to their field guides to be able to do this. Depending on the number of different species caught, student groups can share with the entire group their turtle’s identification and its distinguishing features, sex, and selected other information (for example, how many eggs a female of the species might lay or what kind of food it prefers).
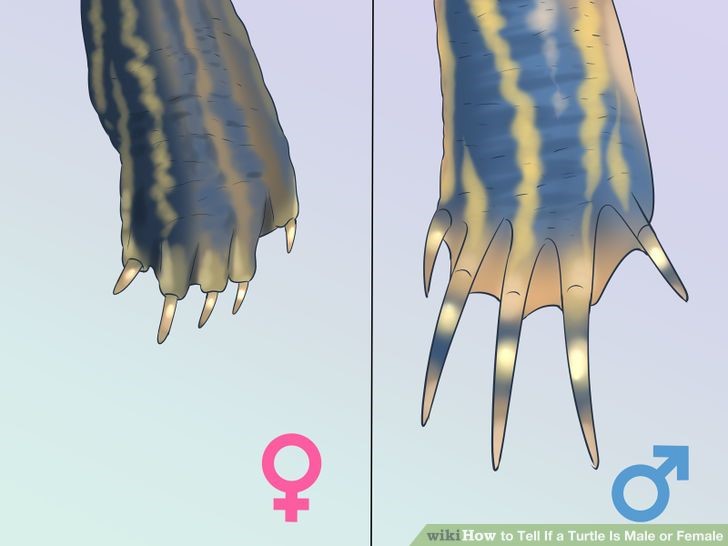
Nails on the forelimbs of males are longer than those of females.
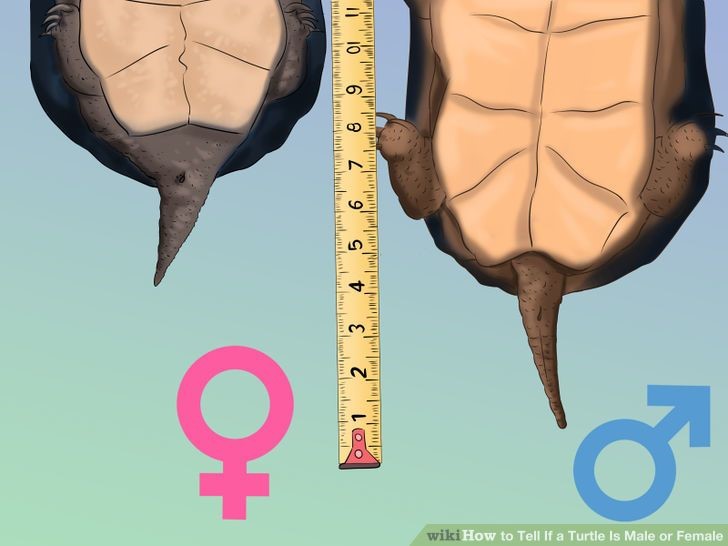
Typically, male turtle tails have vents outside the edge of the carapace while females have vents inside the edge of the carapace.
Measuring Turtles
If submitting data to The HERP Project or another database, take the following
measurements for each turtle:
- Straight carapace length (midline, notch to notch)
- Width at widest point
- Shell height at tallest point (carapace to plastron)
- Midline straight plastron length
- Mass
Information about our aquatic turtle project and The HERP Project can be found at http://theherpproject.uncg.edu/research/herpetology-studies/aquatic-turtles/. A sample of our data sheet can be found in Appendix A. Another option is to download the free HERP Project data collection app from http://theherpproject.uncg.edu/apps-collecting-data/.
The size of the caliper used depends on the size of the turtle. The smallest caliper possible is generally best. We typically measure in millimeters.
- To measure minimum straight carapace length, put one end of the caliper at the most anterior position of the cervical scute and the other at the farthest position on the posterior end of the carapace, notch to notch.
- To measure width at widest point, determine the widest point on the shell and measure from one side to the other. Make sure the caliper is perpendicular to an imaginary line drawn from the middle of the head of the turtle to the middle of the tail.
- To measure shell height, determine the tallest point of the shell from plastron to carapace. This measurement is important to describe the size of the dome on the turtle shell. Slide one end of the caliper under the turtle next to the plastron and bring down the other end at the tallest point on the carapace. For some turtles, dome shape may give an indication of the sex of the turtle
- To measure plastron length, put one end of the caliper at the most anterior position of the plastron and the other end at the farthest position on the posterior end of the plastron.

Using a digital caliper to measure the carapace length of a Painted Turtle.
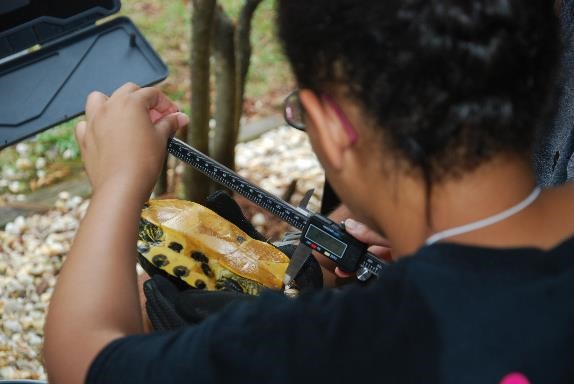
Using a digital caliper to measure the plastron length of a Yellow-bellied Slider.
Weighing Turtles
- If using a platform scale, place container on the platform, tare (zero) the scale, and then add the turtle. We measure mass in grams.
- If using a spring scale, the size of the spring scale depends on the mass of the turtle. The smallest scale possible is generally best. Make sure that the spring scale begins at zero.
- Tie loops at both ends of a small piece of rope to make a saddle for weighing turtles. The rope’s length and thickness depends on the size of the turtles.
- Hold the turtle low to the ground and wrap the saddle around the shell of the turtle. Insert one loop into another, tighten so the animal is secure, attach the other loop to the spring scale, and read the mass. Remove the turtle from the saddle to determine the saddle’s mass; subtract this from the first measurement.
Massing the turtle with a spring scale.
Mark-Recapture Studies
The HERP Project is conducting mark-recapture studies. This is indicated on the data sheets by “turtle code” and “new or recapture.” Mark-recapture population studies are conducted to determine the types and numbers of animals that are in a particular area, providing baseline data so that population changes can be monitored over time and over environmental changes that occur.
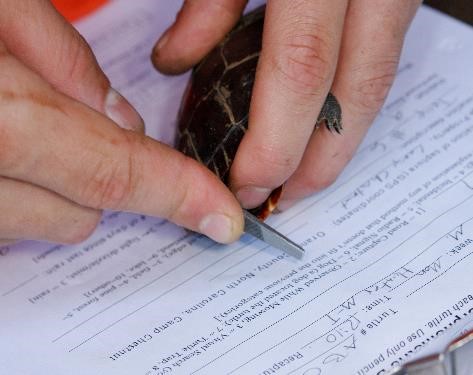
Filing the carapace so that this Painted Turtle will be recognized if caught again.
Metadata
Metadata are data that provide information about other data. If a biological inventory or population study is being conducted, document the site location, trap location(s), and the day and time of each capture event. Also record total trap captures. Here is an example of the information that would need to be collected:
On June 15, 2017, we set 5 baited (sardines) traps in the Country Park Lake at 2 PM. The location of each trap is marked on our lake diagram [not provided here]. We retrieved the traps on June 16, 2017 at 10 AM. We found the following in each trap:
Trap 1: nothing was found
Trap 2: 3 Yellow-bellied Sliders (data collected on all)
Trap 3: 1 Yellow-bellied Sliders (data collected) and 1 large snapping turtle (released and no data collected)
Trap 4: 2 Musk Turtles and 5 fish (data collected on both turtles, fish released)
Trap 5: 1 Painted Turtle (data collected)
A Non-Trapping Option: Observing Basking Turtles
Select a pond, lake, or river to monitor. Basking turtles are most active in warm weather in the middle of the day. Upon arrival at the site, find a good position from which to observe. If some participants have binoculars, the search range can be wider. As participants observe turtles, have them describe to the rest of the group the distinguishing characteristics that identify this turtle species. Record the site’s GPS location.
Data Reporting to The HERP Project and HerpMapper
There are citizen science projects that provide a place to share findings. Species, location information, and pictures are needed to participate in this project. Through use of The HERP Project application (available for free download at http://theherpproject.uncg.edu/apps-collecting-data/), participants record data and upload it to an open source database found on The HERP Project website (http://nc-herps.appspot.com/). This enables us to compare our data with previous years, and we can our download data sets for further analysis. Data can be also uploaded to HerpMapper (https://www.herpmapper.org/).
Web Resources
Evol3000 http://wallace.genetics.uga.edu/groups/evol3000/wiki/10549/How_the_Turtle_Shell_Evolved.html
Gibbons, W. Turtle Population Studies. Carolina Tips. http://classroom.jc-schools.net/coleytech/climate/Carolina%20Tips.pdf
Gregory, M.J. Estimating Animal Populations Using Mark-Recapture Techniques. http://faculty.clintoncc.suny.edu/faculty/michael.gregory/files/ENV%20101/ENV%20101%20Laboratory/Mark-Recapture%20Sampling/lincoln%20instructions-dried%20bean%20version.htm
Pet Education. www.peteducation.com/article.cfm?c=17+1797&aid=2700
Books and Articles
Amstrup, S.C., McDonald, T.L. & Manly, B.F.J. (2005). Handbook of Capture-Recapture Analysis. Princeton, NJ: Princeton University Press.
Beane, J.C., Braswell, A.L., Mitchell, J.C., Palmer, W.M., & Harrison, J. R. (2010). Amphibians & Reptiles of the Carolinas and Virginia. Chapel Hill, NC: The University of North Carolina Press.
Buhlmann, K., Tuberville, T., & Gibbons, W. (2008). Turtles of the Southeast. Athens, GA: The University of Georgia Press.
Gibbons, W., Greene, J., & Hagen, C. (2009). Turtles: The Animal Answer Guide. Baltimore, Maryland: Johns Hopkins University Press.
International Society for Technology in Education (ISTE). (2007). Student Standards
https://www.iste.org/docs/pdfs/20-14_ISTE_Standards-S_PDF.pdf
NGSS Lead States. (2013). Next Generation Science Standards: For States, By States. Washington, DC: The National Academies Press.
Palmer, W.M. & Braswell, A.L. (1995). Reptiles of North Carolina. Chapel Hill, NC: The University of North Carolina Press.
Visual learning software
VL HERPS is a free visual learning software program designed for learning reptiles and amphibians of the Southeast at home. http://theherpproject.uncg.edu/ visual-learning-software/
 This project is supported by the National Science Foundation, Grant No. DRL-1114558. Any opinions, findings, and conclusions or recommendations expressed in this manuscript are those of the authors and do not necessarily reflect the views of the National Science Foundation.
Transcript Trapping Turtles in a Hoop Trap
Leader: I want you to go into this lake, go on either end of the trap, and pull up at the same time on the hoops. Alright? Ok.
Participant: Do you wanna go first?
(Two participants go into the lake and reach for the Hoop Trap.)
Leader: Do not touch the pipe, guys. Remember, hold it up by the hoops. (Participants grab the trap and lift by the hoops at either end.) Perfect.
Participants: Wow, look at that, there are fish in there.
Leader: And two turtles. Alright, now bring it up.
Participant: Are you going out first or do you want me to?
(Participants bring the trap out of the water.)
Leader: Excellent.
Since these are smaller turtles we can actually go through the mouth of the trap and not have to take out the back. So what I want you guys to do is, sometimes when they’re that far away you want to break it down a little bit. Get your hand in there, be careful of the mouth because, yes, they still can bite, and just fish your way out, like that. And remember to do the sandwich. There you go, Jimmy. And now Amber, you wanna try doing it?
Amber: Of course!
Leader: Be mindful of the head! Yeah, just like that. Perfect.
Transcript Parts of the Turtle Shell
Terry: Alright, so we got a turtle in our trap, good jobs! So the first thing we want to do is make sure we remember the parts of the turtle shell because we want to identify this turtle and we do with features and we have to know the parts of the shell.
So, who remembers the name of the top shell?
Participant: Is it a…
Terry: It’s curved like a “C”.
Participant: Carapace?
Terry: Carapace, right. So the top shell is the carapace and there are some important plates on the carapace that we need to remember. The ones that go right down underneath the backbone, underneath the vertebrae, do you remember what we called those in the classroom? They go under the vertebrae… The vertebral scoots. The vertebral scoots. And then on either side of the vertebral scoots we have the costal scoots and what are the ones around the edge called?
Participant: The marginal scoots?
Terry: The marginal scoots, good, the marginal scoots. And remember, it’s the marginal scoots that we’ll use on this particular species’ back to see whether they’re smooth or whether they’re indented.
So we’ve got the carapace on top, we’ve got the vertebral scoots, the costal scoots, and then the marginal scoots, right. Now, what is the shell on the bottom called? Turn it over for us, Amber, so we can see the bottom. Watch out for your fingers with that head. So what’s the bottom shell called?
Participant: The plastron.
Terry: It’s not the carapace, it’s the plastron, right. The plastron. And you can see the different plates in the plastron. For the turtles in our area, the most important plate on the plastron is gonna be this one at the top and it is called the gular plate. So tell me what you notice on the gular plate of this turtle.
Participant: There are two dots.
Terry: Two black spots and that’s one of those distinguishing characteristics of this particular turtle. So we’ve got the plastron, we’ve got the carapace, and what’s this area called right here where the two connect?
The bridge, remember? It’s called the bridge, right.
Using shell diagrams found online, draw the carapace scute borders on one bowl and the plastron scute borders on another bowl. Cut the plastron bowl to size, which will depend on species. Staple the two pieces together in the area that would be the bridge.
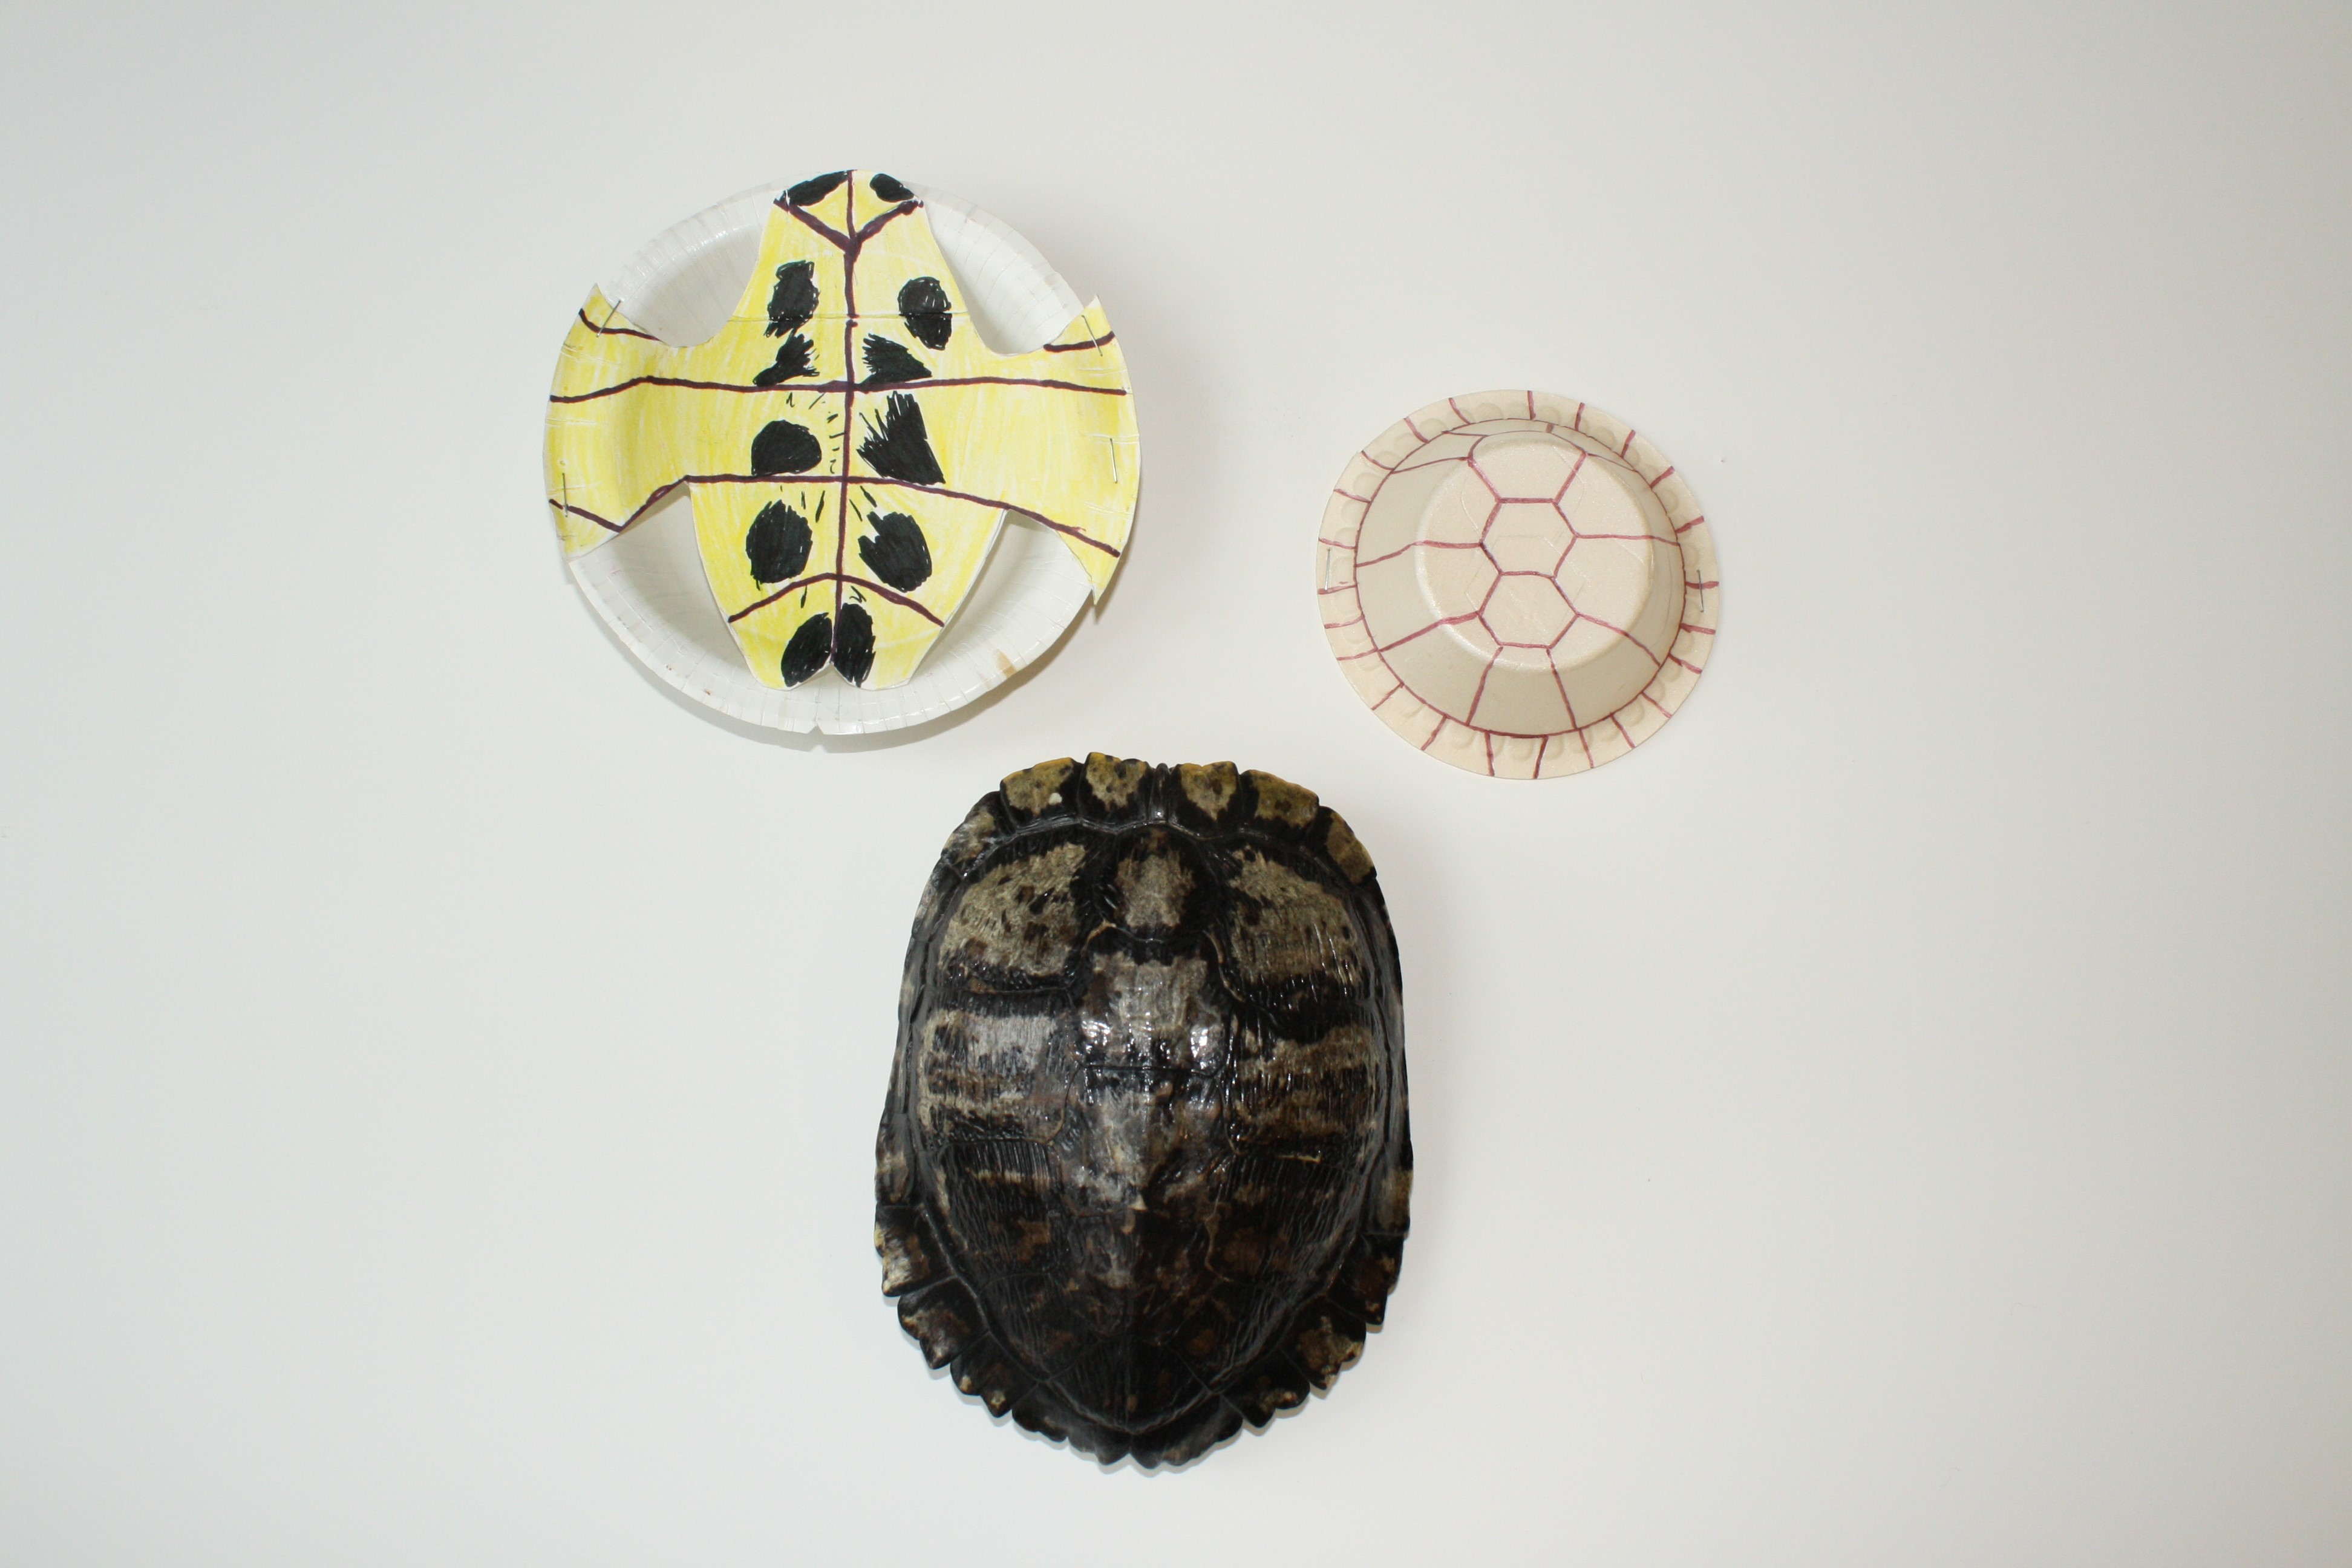
Styrofoam and real turtle shells.
The HERP Project: Aquatic Turtles June 7.2017 (docx) OR Aquatic Turtles June 7.2017 (pdf)