Links to access each curriculum project:
Ι The Box Turtles Project Ι The Ephemeral Pools Project Ι The Lizards Project Ι The Semi-aquatic Turtles Project Ι The Stream Amphibians Project Ι
The Snakes Project
 Written by:

Ann Berry Somers, Catherine Matthews, Lacey Huffling, and Courtney Anderson
Reviewed by: Amy Germuth, Terry Tomasek, Douglas Lawton, and Lynn Sametz
Before starting a project similar to the one described in this curriculum, contact your state wildlife resources commission or state division of fish and game to see what kinds of permits you need to work with animals.
This curriculum describes the snakes program as presented in the Herpetological Research Experience (HRE) program developed by The HERP (Herpetology Education in Rural Places & Spaces) Project. By providing these guidelines we hope to provide ideas to formal and informal science educators for running your own educational program on snakes.
Our investigations last about 3.5 hours, involve 5-7 participants, a Project Leader, and an assistant. The first hour is spent outdoors walking the local fields and woods, checking under logs, debris, and coverboards (pieces of plywood and tin that have been previously laid down on the ground to provide additional cover). While walking, everyone takes a turn telling stories from their own lives involving snakes. Using the inquiry method of investigation, the Project Leader promotes discussion about eco-regions, ecology, and the importance of predators. The remaining time is spent indoors in a large room where we examine live snakes, learning about anatomy, biology, identification and behavior. Our goals are to have students learn about and appreciate snakes, and most importantly, develop empathy for snakes.
Because our intent is to help participants learn about their own environments and local fauna, our snakes program depends heavily on the use of wild animals captured and held for the duration of the HRE. Captive bred snakes can be used, but should never be released into the wild. For more information on why this is so important, consult the PARC (Partners in Amphibian and Reptile Conservation) pamphlet called Don’t Turn It Loose, available free online.
![]()
![]()
![]()
![]()
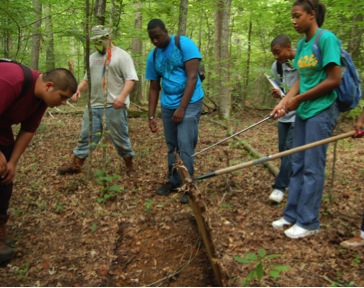
Participants checking a coverboard
After completing this project, participants will be able to:
- Describe what coverboards are and why they are useful in herpetology
- Explain the importance of snakes in ecosystems and to humans
- Describe aspects of a snake’s biology (hearing, smell, and touch) and behavior, including how snakes respond to threats
- Describe at least three biological characteristics used to identify snakes
- Demonstrate safe techniques for catching and handling snakes
- Express empathy for snakes (verbally or in writing)
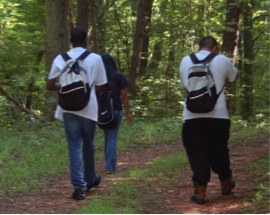
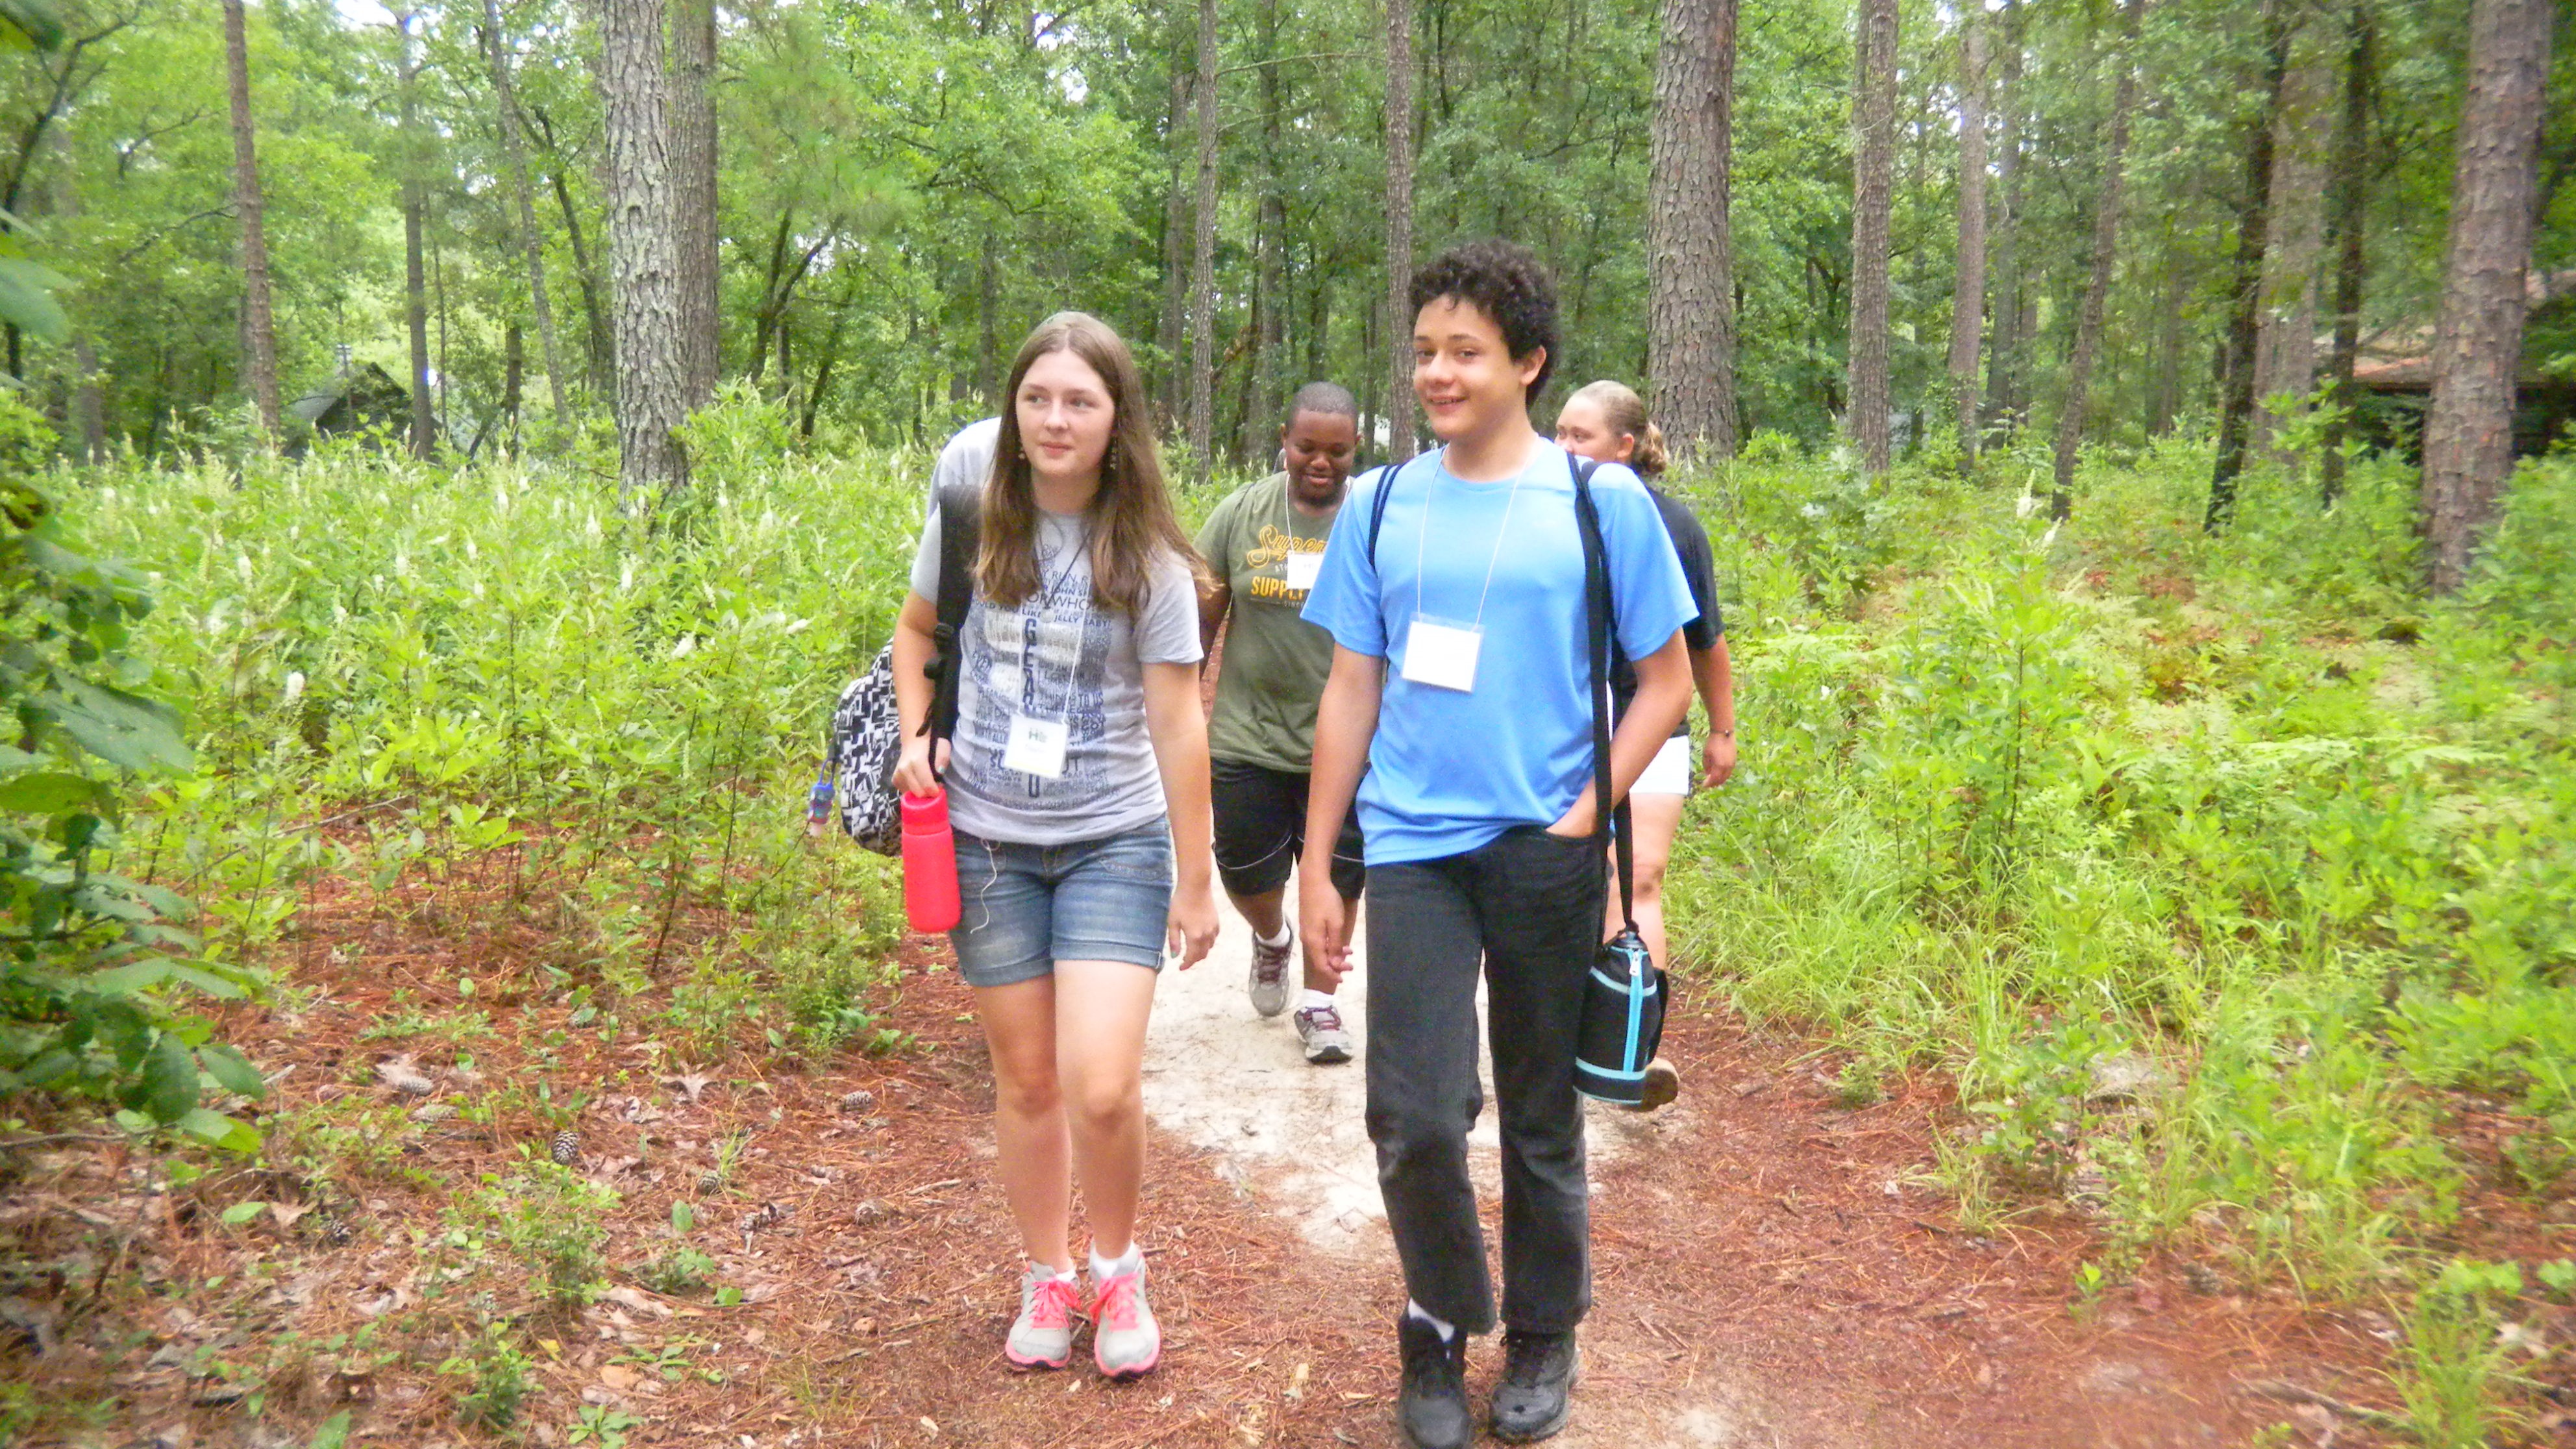
Students dressed for fieldwork. Notice they carry backpack filled with water and other supplies, and they are wearing long pants and boots.
While doing fieldwork in North Carolina, participants may encounter insects and other arthropods including chiggers, yellow jackets, ticks and spiders. Using insect repellant (but not on your hands if you plan to collect herps) and wearing a hat and long pants are useful ways of preventing these animals from biting you, stinging you or attaching to you. Pulling one’s socks over the bottoms of pants legs is an especially good way of preventing ticks, chiggers, and spiders from crawling up your legs. Participants should also wear sunscreen and carry water; sturdy boots are useful when hiking in rough terrain. If you are in an area where you may encounter snakes, know that feet and ankles are the most common bite locations, followed by hands. Wear protective footwear and long pants or gaiters and look before you place your hands down or around a tree. Always hike with a partner and let someone else know your itinerary.
Snake Bites
If a snake bites you or another hiking partner in the field, do the following:
- Help the victim remain calm to slow the spread of venom (if it is a venomous snake or you are not sure if it is venomous). Remind them that many snakebites are dry, meaning that the venomous snake does not release venom when it bites.
- Remove jewelry and other potentially constricting items in case swelling occurs.
- Clean and cover the puncture wound. Immobilize the bitten limb with a splint, if possible.
- Keep the victim from exerting himself/herself to slow the venom.
- Transport the victim as quickly as possible to a hospital for observation and, if warranted, anti-venom treatment. To prevent exertion by the victim, carrying the victim on a stretcher would be best. The victim could also walk at a relaxed pace to minimize exertion.
- Do not use a tourniquet or constriction bandage. Do not cut the wound or attempt to remove the venom. Do not use electric shocks or apply ice.
- Do not try to capture the snake, but do try to remember its color and shape so you can describe it, or better yet take a photograph from a safe distance.
If a non-venomous snake bites you, wipe the area with antiseptic just as you would an insect bite and cover it to prevent infection. Continue to watch the bite site and get medical help if the bite seems to be getting infected.
The purpose of this section is to describe safe ways that you might catch wild snakes for your programs. These are the same handling techniques you will show the participants in your snake education sessions. Please note, participants in The HERP Project never catch or handle snakes unsupervised and they never catch or handle venomous snakes in our program.
Catching Snakes
Collecting permits may be required from your state wildlife agency so be sure and contact the agency permit coordinator for accurate information. Catching and removing snakes from the wild, even temporarily, is normally disallowed in local, state and national parks. Preferred places for catching snakes are on private property or while they are crossing roads. You must have permission from landowners if you plan to catch snakes on their private property. Be careful when stopping on roads as it is easy to get rear-ended if you stop too fast for a snake.
The first rule of catching snakes is never touch a snake unless you know what kind of snake it is. Learn to identify the snake species in your area, and learn their habits, habitats, and behaviors. Some snake behavior is predictable and some is not just as some snakes bite and some do not. Be prepared to be bitten if you are catching snakes that bite. If you are horrified at the idea of having a snake bite you, don’t catch snakes, as your fear will be dangerous to you and to the animal. Be smart and you will be bitten many fewer times in your herpetological career, but expect to be bitten occasionally if you handle snakes!
Small Snakes
Catching small species of serpents like worm snakes and ring-necked snakes is easy. You simply pick them up gently by the middle section, usually without harm to the animals or yourself. Many small species of snakes don’t bite people. Of course, any animal with a mouth can bite, but some snakes just don’t seem to ever think of it since escape or camouflage is their main defense. Expect the snake to expel musk on you as a repellent. Musk is a foul substance emitted from the vent as a fear response and is meant to deter predators. It washes off easily, so don’t let this discourage you. Young snakes (of larger species), such as neonates (newborns) and small juveniles, may display defensive behavior and may bite more readily than their adult counterparts. If bitten, don’t jerk away as you can easily damage their delicate mouths. Sometimes it is best to admire the snake in situ (where you find it) and let it go on its way rather than try and catch it.
Large Snakes
Catching large snakes by hand is a skill that must be practiced. Catch a snake gently. When approaching your quarry, be quiet and slow. Once a snake becomes aware of your presence it may respond in several different ways: flee, remain frozen in position, or become agitated. Some snakes demonstrate their agitation by tail whipping, musking, tensing their muscles, or striking. Even when this occurs you can successfully catch a snake without harming it, but you need to be swift but calm. If possible, approach the snake from behind and do not make sudden or jerky movements. Dropping a towel, pillowcase, or empty snake bag over the head (hooding) will briefly distract the snake. Use this advantage and gently grab the snake without hesitation by its middle and immediately support its body from underneath. Snakes typically tense up and jerk when first touched, so expect this to happen. If the snake begins to jerk or to strike, don’t let go and don’t squeeze tighter. Remain calm and bag the snake (see Bagging below) as quickly as possible, or release it carefully on the ground. If the snake bites you, don’t jerk away as you may damage its mouth. Bites are to be expected occasionally, even when handling non-venomous snakes.
Snake hooks can be used to handle larger snakes, but these are rarely used when capturing non-venomous snakes. If needed, use the hook to keep the head end away from the handler; a second hook may be useful to support the bodies of larger specimens. Good balance and concentration are required. We use snake hooks to demonstrate their use and let students practice using them with predictably-gentle larger snakes like black rat snakes and corn snakes.
Tongs (sometimes called Pillstrom tongs) can be used to grasp snakes gently from the middle, but we don’t recommend using them with non-venomous snakes. Use of tongs can harm the animal, break bones, and damage soft tissue. They may cause scale abrasions unless the jaws of the device are padded with foam rubber. Grabbing snakes by the neck with either tongs or hands is discouraged. Lassos do not work well on snakes.
Bagging (Sacking) Snakes
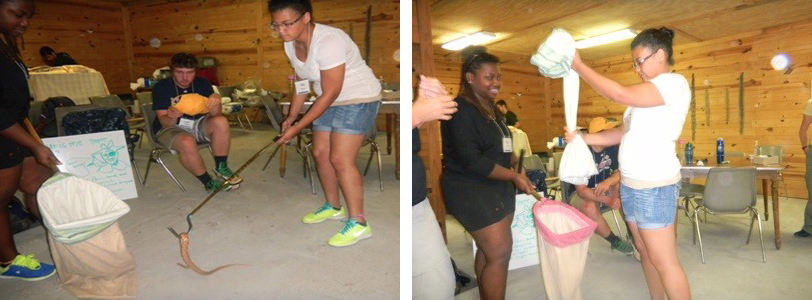
Bagging (sacking) snakes is a method by which they can be transporting safely. A typical snake sack is much longer than it is wide. The bags can be of various sizes and can be purchased or homemade. Pillowcases can be used effectively for purposes of bagging and queen- or king-sized pillowcases are better than the standard size, but either will work.
Small snakes are simply hand-placed in the bottom of the bag carefully. Shake the bag so that you are sure the snake is in the bottom. Before knotting the top, grasp the top of the bag with one hand and with the other hand squeeze the bag from the top moving downwards to be sure the snake is still at the bottom. Twist the top part of the bag before knotting the bag using a tight knot that can be undone quickly. Only one snake should be in a bag.
Bagging large snakes is more difficult than it might appear on TV. They can sometimes be coaxed into a bag on a ring attached to a handle (snake sacker) without being handled, but beware as strikes and escapes can occur when getting them in and out of bags. For slow moving species of snakes, a bagging stick (snake hook) can be useful. The bag is held open on the ring and snakes picked up with hooks or tongs and simply dropped in.
When the animal is in the bag, the neck of the bag is sealed by gripping it tight and twisting it, then tying a knot in the twisted part. You must act quickly if you are dealing with a very fast snake and be certain that they are not climbing out when you knot the sack. Their heads may need to be immobilized from outside the bag before it can be tied safely, but this must be done with great care. Snakes are able to bite through bags. Therefore bags containing snakes should only be picked up by the handle above the knot and always kept well away from the body.
When releasing a snake from a bag, simply untie the bag and then untwist the bag, as the snake is unable to escape until the twist in the bag has been removed. At that point, gently shake the snake out of the bag if it does not leave of its own accord.
To release a nervous, wiggly, large snake from a bag, secure the snake gently near the front of the body from the outside. While keeping the snake secured (and its weight supported), untie and untwist the bag, before gently shaking the snake out.
When releasing animals, allow animals to crawl under rocks, logs or coverboards instead of putting the cover pieces on top of the animal, and always return them to the place where they were found.

Instructor fielding student questions and helping to answer question about snake skin.
Experience is important for leadership of the snakes project. Leaders should be able to identify the common snakes of the region, know how to care for different kinds of snakes in captivity, be calm around snakes (even those that are nervous or irritable), and be able to handle them confidently and safely. Snakes and people have a tendency to scare each other, so the person leading the project should be sensitive to student anxieties as well as the snake’s fears. The leader should use the inquiry method of teaching to best engage participants. Asking questions rather than just telling students facts is called inquiry based learning. This method helps ignite personal inquiry and enhances student interest in the material. The Project Leader becomes a facilitator, guide and partner in learning rather than a lecturer. In subsequent sections you will see some examples of questions that are useful in this unit.
Part 1: THINK HABITAT (about 1 hour) is conducted outdoors. Activities include walking, storytelling, noticing eco-regions, and looking under logs and coverboards.
Announcement prior to gathering: Insect repellent may be used but participants must wash their hands prior to departing. Repellent could harm the animals. Once the group gathers, introductions are made and the program is described prior to departure. Participants are invited to carry the snake bags or snake hooks.
Let participants know the expectations before embarking on the walk: the group will stay together while walking, everyone will tell a snake story, and everyone should have access to a field guide. Our participants are required to wear name tags and leaders are encouraged to call participants by name.
Participants sharing stories of snake experiences.
Materials
- snake bags
- hand wipes
- field guides to local reptiles and amphibians
- a snake hook (rarely used)
- hoes or sturdy rakes to turn coverboards
Storytelling
Everyone has a snake story they want to tell, so we begin our program taking turns telling stories as we walk the grounds checking coverboards. If a participant can’t think of a snake story, suggest they tell about their favorite snake or most-feared snake or a snake fact they find fascinating. Although most of the stories end badly for the snake, the Project Leader listens carefully, shows interest in the individual student, and is nonjudgmental. Storytelling provides a chance for the students to talk, to be heard, and to reveal a little about themselves. Most participants enjoy talking about themselves and learning about others in this way and thus this activity is a great ice-breaker.
Questions you might ask along the way: Why are coverboards attractive for animals? Do you think coverboards in sunshine or shade would be most attractive for snakes? Do you think two different kinds of snakes will use the same coverboard at the same time? What are snakes eating in this area? Do any snakes eat plants? What do you think the ancestors of snakes looked like? What would you call this type of habitat?
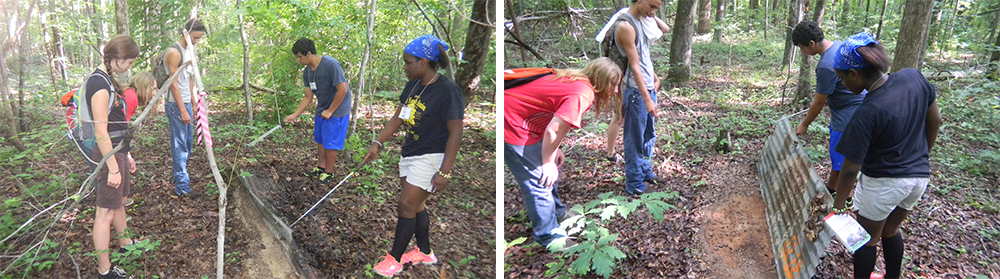
Checking Coverboards
This can be done solo, but having a group means we can designate two people as “catchers” and two people as “lifters.” Catchers are agreeable to catching reptiles or amphibians found under the boards. It is not unusual in our areas for all of the coverboards to be checked during summer, when our programs are held, and no snakes found (spring and fall are much better times for finding snakes under these types of cover). Lifters lift the coverboards, preferably using a tool such as a hoe, (reaching across the board to lift the side farthest away so that the animal underneath will not see the lifters. The catchers are ready to spring into action, but stand perfectly still as the board is being lifted. If a lizard or snake is uncovered, the catchers quickly gather it. Even if surprised, the lifters DO NOT drop the coverboard as it could harm the creature below.
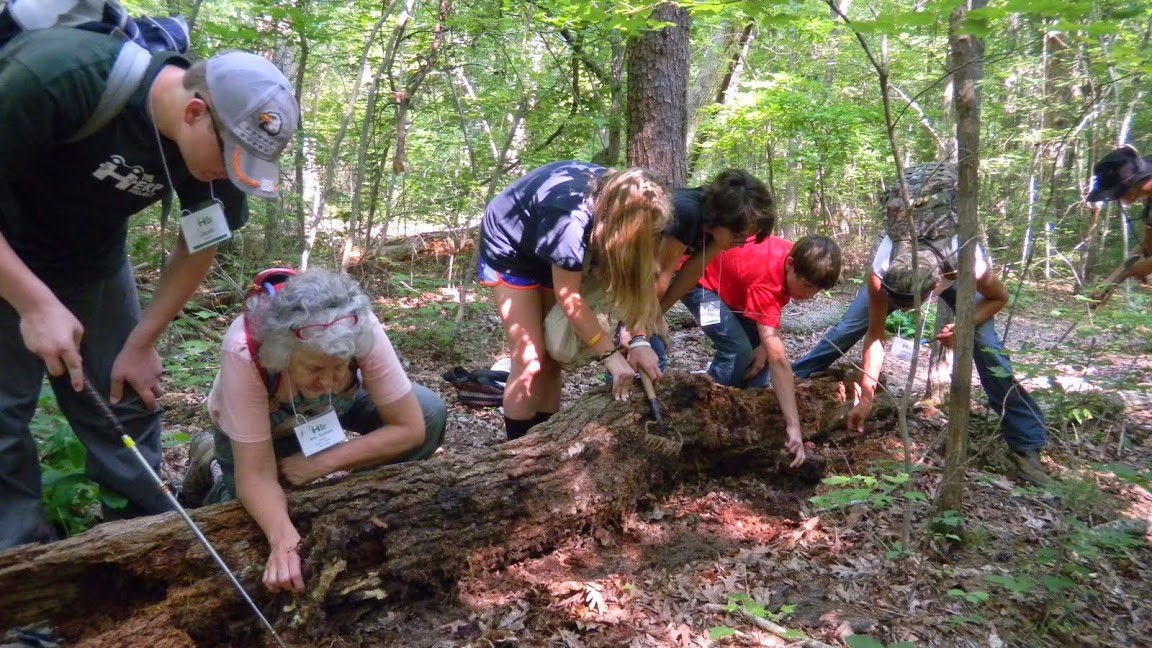
Scrape around under the coverboard if leaves and other debris are present. Several animals of different or the same species may be present. Don’t forget to look for animals of all types, especially invertebrates. Try to decide if the invertebrates are herbivores or carnivores. Invertebrates can serve as food for various reptiles. When done looking, gently place the coverboard back on the ground.
Snake-Watching
Although our programs do not include snake watching outdoors (unless a special opportunity presents itself), you should let participants know that observing snakes from a comfortable distance is a worthwhile and enjoyable activity. One can learn a lot about snakes such as their behaviors, fears, and needs if you watch them long enough, though some stay perfectly still for hours. Observing snakes in nature or in captivity will allow you to begin thinking like a snake and to understand the motivations driving their behaviors. Not frightening the snake is important for both watching and catching. Of course, in order to watch snakes, one needs a suitable place where they are likely to find snakes moving about, basking, feeding, or swimming. Ask your local park ranger about good spots to find wildlife. Roads and platforms overlooking swamps are particularly suitable for this type of activity.
Using binoculars can be a great help, and you can let your birding friends know that binoculars are for more than watching birds! Insects, frogs, turtles, and other herps are exciting subjects too.
Part 2. THINKING LIKE A SNAKE is our indoor activity. This section includes Materials, Preparations, Empathy for Snakes, Snake Biology, Snake Senses, Snake Identification, Handling Guidelines, Shed Skin Study, and Measuring Snakes. Feel free to experiment with the order of these activities.
Materials
- 5-7 snakes (non-venomous, local, wild-caught and a few captive bred snakes)
- Cages with covers and DO NOT REMOVE COVER signs on each (where the snakes are kept)
- Snake identification books
- 5-20 shed snake skins, some from venomous species if available
- Hand-made squeeze box, string, and measuring tape or wooden meter stick
- Snake and mammal skulls (if available)
- Models of local venomous snakes (a good source is Morgan Reptile Replicas)
Preparation
This section includes background material related to the numbers and types of snakes used in our program. We house 18-20 native wild-caught snakes so that 5-7 of them will be available each day for our 5-day program with 5-7 participants per group. Our snakes are caught specifically for this purpose and are released exactly where captured when the sessions are completed. This seems to be a successful strategy since we have caught some of the same snakes in successive years in the same locations.
Please note that caring for wild-caught snakes takes more experience than caring for captive bred snakes. Consult your state zoo or herpetological society for advice and use the considerable online resources that are now available. Sometimes local nature centers do not have someone on staff with the requisite expertise to advise you so seek experienced help.
Why so many snakes?
We house about three times as many snakes as we will use in any one day. The reasons are:
- Our programs are offered every day for five days. Programs offered less often would not need as many snakes.
- As a rule, we don’t handle individual snakes two days in a row. Snakes tire easily and the teaching sessions are more stressful for some species than others. Fatigued snakes are irritable and may strike at cage walls more readily.
- We don’t handle snakes that are in-shed (preparing to shed skin as evidenced by opaque eye coverings), but we use them to show students how to recognize snakes in-shed, sometimes called “in the blue.”
So in our program, it takes about 19-20 snakes to be able to have 6-7 ready for a daily session when programs are held daily. We also use 1-2 captive bred snakes for level-one snakes (see Levels of Engagement). Programs utilizing more captive bred snakes (pet snakes) may be able to house fewer captured snakes.
What kinds of snakes are used?
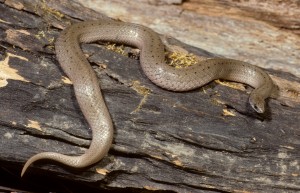
We want students to become familiar with local snakes so we use small, medium, and large species of non-venomous snakes that are common in our area. For example we use Eastern garter snakes (Thamnophis sirtalis), black racers (Coluber constrictor), black rat snakes (Elpahe [Pantherophis] obsoleta), worm snakes (Carphophis amoenus), brown snakes (Storeria dekayi), mole kingsnakes (Lamporpeltis calligaster), and the like. A high-quality model of the venomous copperhead (Agkistrodon contortrix) is used for identification and comparison with other blotched snakes.
Captive snakes can also be used along with local snakes, but using primarily local wildlife supports our goals of engaging participants with the local fauna, ecology and ecosystems. We use a few long-term captive snakes (captive bred) temporarily loaned by friends of the project or staff members.
Empathy for Snakes
Biology is very important, but to truly understand and appreciate snakes it is important to learn what is important to them, how they manage living successfully, and why it is important for humans to understand them. It is also important to know what scares snakes. Observing snake body language while they are in the cages is an important first step to empathizing with them.
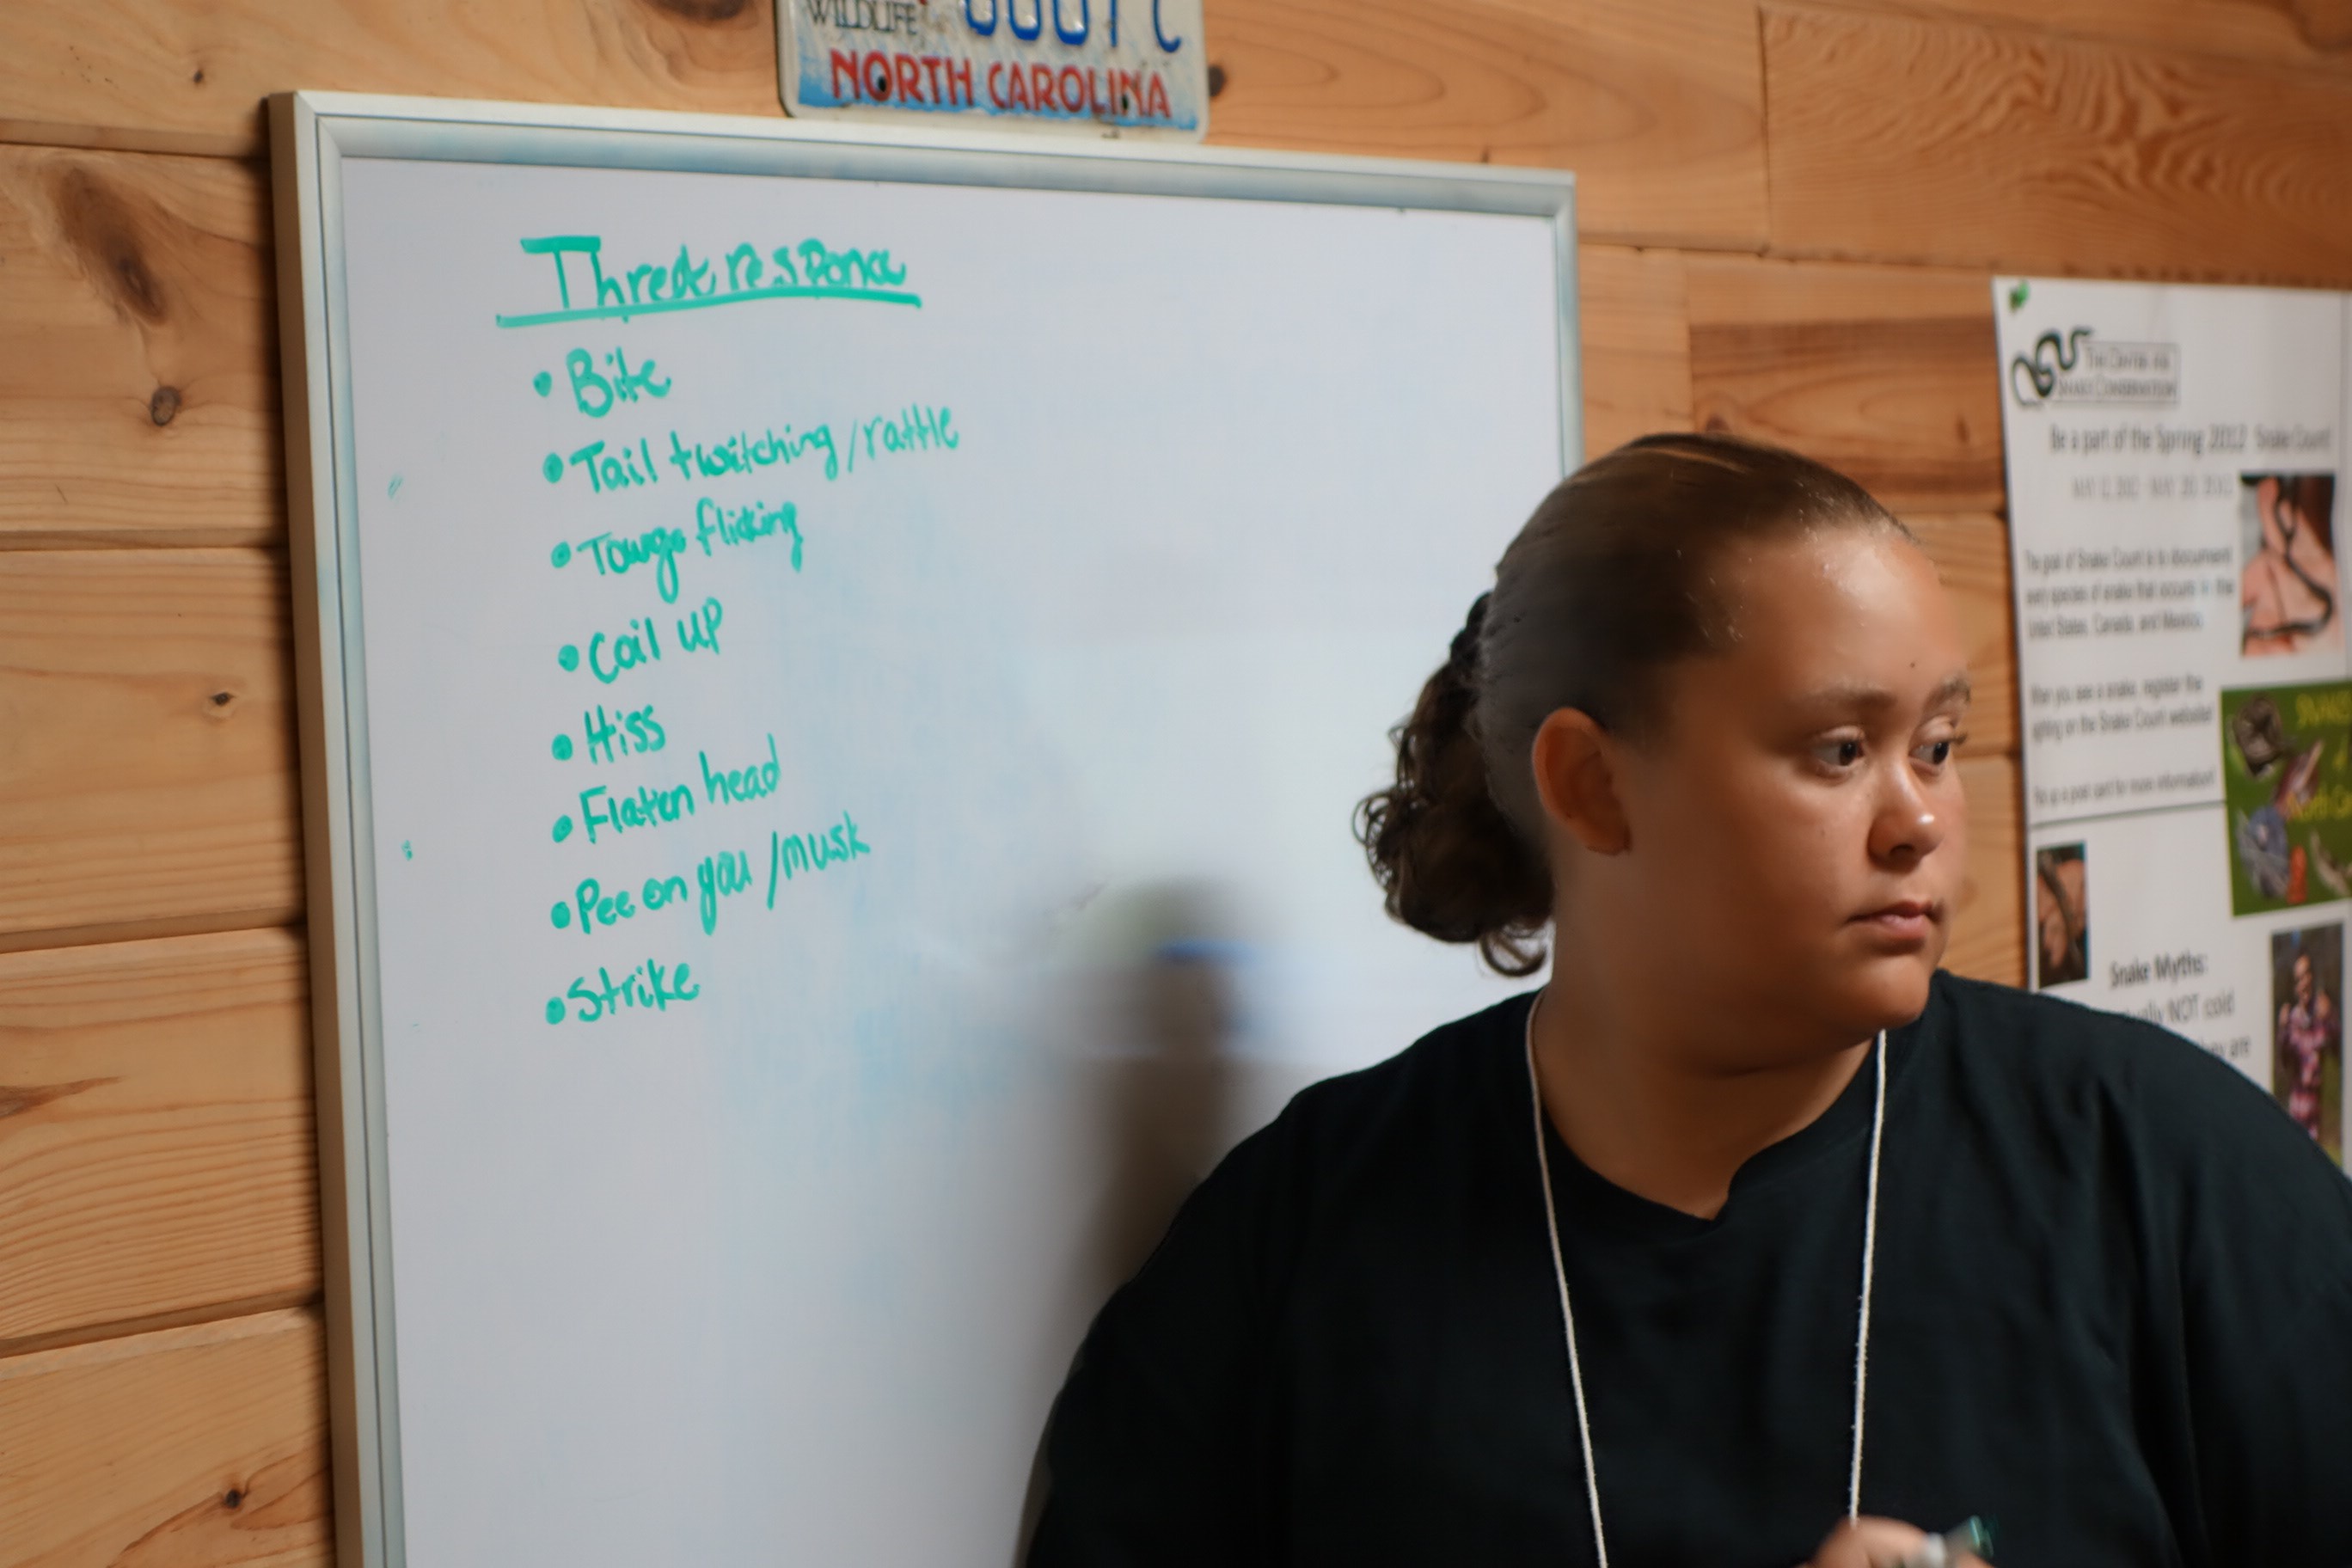
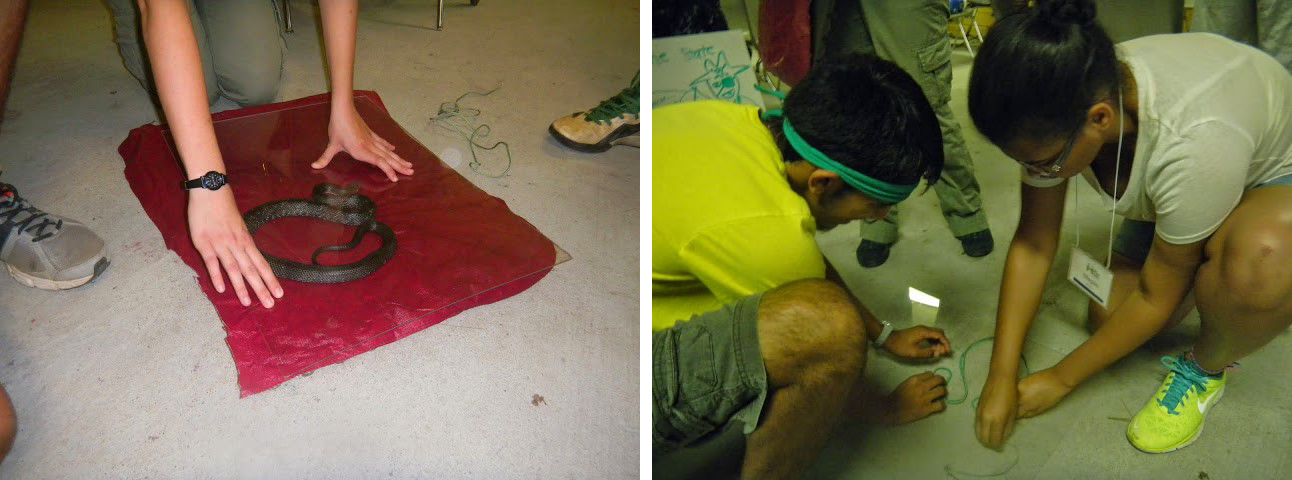
Actively engage participants in every way possible. This student was recording responses to How do snakes respond when they are afraid?
Begin by asking participants what they think the word empathy means and describe what it means to you. Use the sample questions below or come up with others. Ask the question, then give time for responses. Be affirming and positive when students respond (even with wrong answers) and don’t give the correct answers right away. How can you tell when a snake is afraid? or How do snakes respond to threats? These questions are particularly important so make time to discuss this subject in some depth. Have a student write the responses of the participants on board. Let the students call out ideas. Note that no one type of snake will exhibit all the responses mentioned.
Discuss and elaborate as this is one of the best exercises to help students develop empathy for snakes. Answers should include at least all the following: flight, increased respiration, kinking body (muscle contractions), jerking movements, striking, biting, musking, twisting if you are holding them, flattening head, some species hiss and spread neck (e.g. hognose snake), thrashing, dropping from limbs in an attempt to escape, playing dead, coiling, shaking tail, increased alertness, etc. Additional questions related to the same concept are:

Nails on either side of vent in pythons and boas are vestigial structures, which provide support for lots of other evidence that snake ancestors once had legs. Photo by M. Baumeister.
What does it mean when the muscles of the snake tense up? When a snake strikes at a person, what is it trying to accomplish?
Describe some of the other body language of snakes not related to fear. Tongue flicking, ambush position, coiled in hiding, actively moving about.
What is important to a snake? Food, mates, water, privacy, safety, dens or rookeries for some species, ability to control temperature, etc.
Why are snakes important? Are snakes predators or prey? Snakes are important as both prey and as predators. Discuss the food chain and the importance of predators to the health of the ecosystem and to the species that they prey on (population control).
Why are they important to humans? Snakes consume animals that we consider pests and protect our food stores by consuming rodents. Snake venom is very important in the production and development of many medicines. Since snakes are important to their ecosystems they are also important to us – stress that humans are a part of the surrounding ecosystems.
Why is it important for people to understand snakes? Snakes are important elements in the landscape and the biological communities in which they are found. Many, many times snakes are brutally killed because people needlessly fear them or their intentions – mostly out of ignorance or instilled fears. Most children do not naturally fear snakes; it is normally a taught attitude. It can be said that the level of environmental awareness, education and compassion is revealed by one’s attitudes towards snakes.
Snake Biology
What is the difference between vertebrates and invertebrates? Which kind of animal is a snake? Vertebrate, reptile.
Which kind of animal are we? Vertebrate, mammal.
What do you think a snake ancestor looked like and behaved like? Just so you know, dinosaurs are not ancestors to snakes. Hint: This type of animal is still around today. Evidence suggests that snake ancestors were a type of burrowing lizard of the early Cretaceous. Snakes lost their legs by growing them more slowly or for a shorter period of time, resulting in shorter and shorter legs, until the legs eventually disappeared. Not having legs gave pre-snakes an advantage in life underground. Those with slower growing legs or shorter legs lived longer and had more offspring (babies) thereby increasing the numbers of leg-less individuals in the population until its legs were lost altogether. However, a few snakes still have remnants of leg bones and nails, like boas and pythons.
Snake Senses
Tongue. What do snakes use their tongues for and why are they forked? Have students observe snakes tongue flicking. Show the students the books in the room that have diagrams of the head of the snake.
The tongue is a sensory organ used to sample the air for important information. Air is full of molecules that are invisible to the eye. Tips of tongues grab samples of air. The two tips of the tongue insert air into two openings in the roof of the mouth where an organ is located. Anyone know the name of that organ? It is Jacobson’s organ, which reads scent and sends messages to the brain. The scent molecules in the air may reveal there is food available nearby or water or mates. Neonate rattlesnakes read scent trails to find their way to the wintering den. The tongue is forked to increase the amount of molecules that are received and also to provide a directional component, comparable to our two ears. If the right fork of the tongue grabs air that has a more powerful signal than the left fork, this tells the snake that the source of the scent is to the right and vice versa. Thus the snake may follow a scent without opening its mouth. This allows a stealthy way for snakes to know what is going on in the world without drawing attention to themselves.
Ears. Do snakes have ears? They don’t have external ear openings but are very sensitive to vibration. Serpents evolved from a type of ancestral lizard and lizards have ear openings, but external ear openings may have been a disadvantage for them. Perhaps they were prone to infection from debris entering the openings, so the ancestor burrowing lizards with small ear openings or no ear openings may have lived longer. Living longer allowed them more years to lay clutches of eggs and they produced more offspring, thereby increasing the number of individuals in the population with small ear openings. Over time, snakes lost ear openings altogether. When they emerged from a sub-terrestrial existence and began living above ground, they came up without external ears.
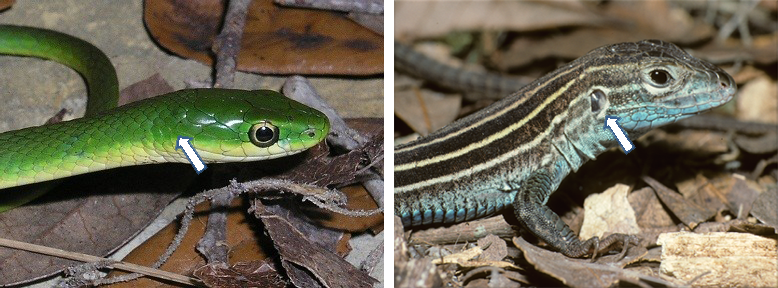
The snake (left) has no ear opening is compared with lizard (right) with ear opening. Photos by Wayne VanDevender
Touch. Snakes are very sensitive to touch. Along with their sense of smell, touch plays a very important role in their ability to survive and respond to threats. Snakes depend heavily on information that comes through their skins and are, at times, able to detect the size of prey and predators based on their vibrations. They are able to feel the slightest changes in their environments and are able to quickly respond to these changes.
Teeth. Preparation: Randomly place skulls on the table. Without explanation ask two students to separate the skulls into those with heterodont dentition and those with homodont dentition. Students can often figure this out themselves and then you can ask them what the words heterodont and homodont mean.
What do snakes eat? All snakes eat meat.
Why are their teeth curved? How would you describe the teeth? Show a snake skull. Mammals, like us, have different kinds of teeth, some sharp, like our incisors, to bite into food, and some flat, like our molars, to grind food. Our teeth are not all the same, and this is called heterodont dentition. Snakes’ teeth are all similar so we would describe snakes as having homodont dentition.
Which animals eat snakes? Who are their predators? Why is predation so important to life? Are you a predator?
How do you tell where the tail of the snake starts? At the vent.
How do you tell if a snake is male or female? It is hard to tell without one of each sex. Look at the first part of the tail, just posterior to the vent; in males the first part of the tail will be thicker and does not taper immediately. In a female the tail will start to taper immediately posterior to the vent. This characteristic is highly variable and the best way to tell is to see snakes mating, because they certainly know which are males and which are females! Another way to tell is by using specialized probes to insert into the cloaca, but we don’t use them and don’t recommend their use as it is very easy to harm a snake unintentionally using probes.
How do snakes reproduce? Do all snakes lay eggs? Many of our local snakes do not lay eggs but are actually livebearers. Live little snakes called neonates emerge from the female’s vent.
What is unusual about a snake’s penis? There are two of them, called hemipenes! Snakes can be identified to species from the morphology of the hemipenes. When mating, male snakes will insert only one into the cloaca of the female. Also see: http://www.sjonhauser.nl/hemipenes-amazing-copulatory-organs-of-snakes.html
Snake Identification
How would you describe a snake to someone who had never seen one? Let the students call out ideas. Have a student write responses on the board.
Prior to having students identify snakes, have them look at characteristics of the skin using shed skins. Distribute shed skins among the participants and talk about the shedding process and why snakes shed their skin.
Do we shed our skin? Yes, but not all at once, we are continually shedding skin cells.
If an opaque snake (about to shed) is available, it can be shown to the participants but should not be handled much. Ask students to find a shed skin with strongly keeled scales, one with weakly keeled scales, and one with smooth scales. Keeled scales have ridges, weakly keeled scales have small ridges and smooth scales have no ridges at all.
Are the ventral tail scales divided or not divided? Can this tell you anything about what kind of snake shed this skin? Is the vent scale divided or not divided? How do the dorsal scales differ from the ventral scales?
How often do snakes shed their skins? It depends on how much they are eating and growing. Some fast growing snakes with a good food supply, especially young snakes, may shed several times a year.
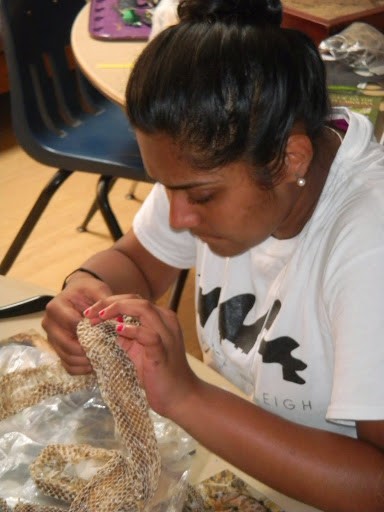
Giving each student a shedded snake skin will help them see the difference between the types of scales.
Looking carefully at live snakes. Snake cages are covered when participants enter the room so they won’t become alarmed. Snakes should always be in cages by themselves. Lightweight display cages with clear bottoms (such as deli containers) will enable participants to see the ventral colors and patterns. Once the participants settle down, the covers are removed and students may move quietly around the room.
Participants work alone or in pairs to identify the snakes. Announcement to participants: Working with a partner or by yourself, use a field guide to determine the species of the snake. Focus on the coloration of dorsal (back) and ventral (belly) sides, anterior and posterior, shape of head, rough/keeled or smooth scales, typical species behaviors and the range of occurrence as indicated by the range map in the identification book. It is recommended to have at least three identifying characteristics before confidently stating which species you have.
Using the copperhead model, students are asked to give an elevator speech (a very short and to the point speech given in the amount of time it would take to ascend in an elevator) describing the difference between a copperhead and another blotched snake such as the mole kingsnake.
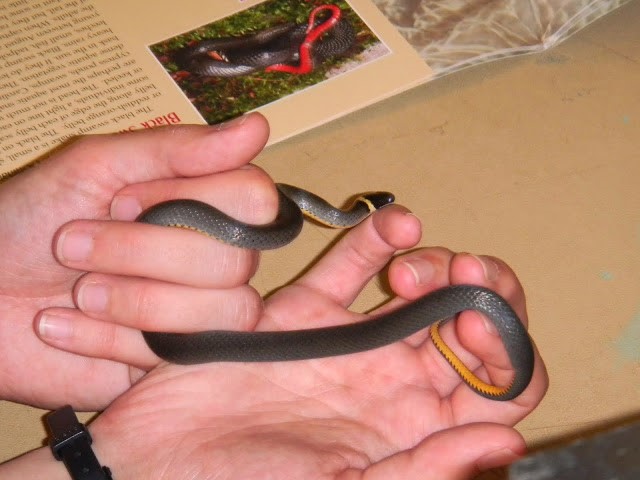
At least three characteristics are needed to support a species identification in our program. In this case, the participant used the ring around the neck, the ventral coloration, and dorsal coloration to support the identification as a ringneck snake.
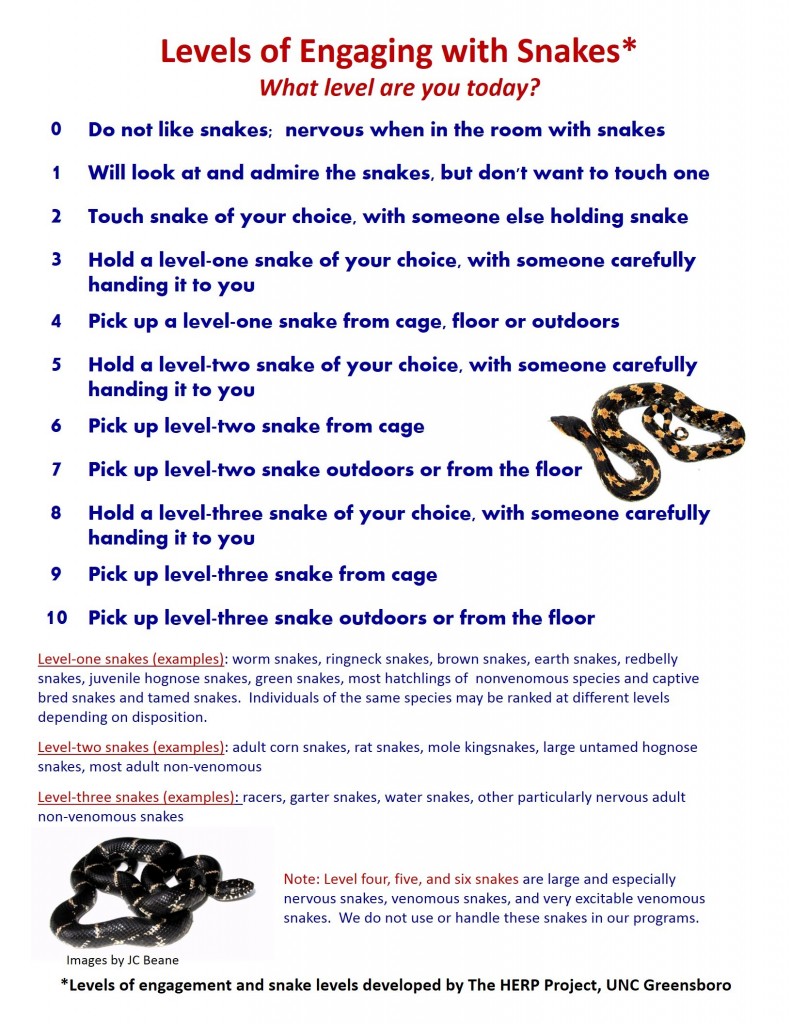
Handling Snakes. The absolute best part of the program for all of us and the most fun is getting to handle the snakes. We have developed a system that motivates students to rapidly overcome fears and to try to engage with the various serpents in challenging ways. At the beginning of our program students are asked to use Levels of Engaging with Snakes poster (see below) to identify the level of engagement they are presently comfortable with in regards to snakes. They are then given the opportunity to see others handling snakes and to touch them if they wish, and, without exception, they all touch a snake before the program is over.
It is useful here to emphasize that this experience is much unlike a visit to a nature center where visitors may use two fingers to touch a captive-reared docile snake or possibly even hold one. Our program allows participants to engage with nonvenomous serpents in the way that herpetologists do. They may, if they wish, pick up a snake from the cage or the floor or catch one outdoors.
 Video Picking Up a Snake for the First Time:
Video Picking Up a Snake from a Box:
Video Picking Up an Adult Snake from an Aquarium:
They may engage with challenging snakes, ones that are nervous, ones that react suddenly, or ones that may strike or bite. Each person decides if he or she wants to climb the ladder of engagement and has calm, professional support from the Project Leader and/or Assistant Leader.
As the session progresses, students tend to become more and more engaged and seek to climb the ladder of engagement. Each day we have a new group in the snakes unit, but word gets out about the snakes and the engagement levels. By the end of the week-long program, new participants are primed for advancement by the gossip as well as the other programs they have experienced in the HRE where they have become accustomed to handling reptiles and amphibians. On the last 2 days, most of the students reach the highest level of engagement and joyfully proclaim such during lunchtime reports. None of our snakes has ever been harmed in this program, nor has any participant been hurt. Only rarely does a student get bitten, but when they do they are quite proud of the marks left on their skin, if they are lucky enough to have something to show off.
Before you engage participants in this way, please review the information on catching and handling snakes at the beginning of this material.

Measuring
Ask students to think of three different ways one might measure the length of a snake. (Have a student write these on board) Some possible responses include “stretch the snake”, “let it crawl along a wall”, “put it into a tube”…
A person could try to stretch a snake but, if you do, you could damage the vertebrae because the muscles will tense in response to your stretching. Snakes will squeeze up and loosen up, shortening and lengthening the spinal column, making it impossible to get an accurate reading.
Dead snakes measure considerably longer than live snakes because there are no muscle contractions to compress the spaces between the vertebrae. Snakes have over 200 synovial joints (moveable joints like our knees and backbones) on their skulls and backbones, which is why live snakes can stretch and shrink depending on muscle contractions and dead snakes with no muscle contractions are so much longer than live ones. My 9-year-old neighbor was fascinated by this news and was inspired to say “That must be why snakes are so bendy!” Indeed it is Jack, indeed it is.
Since there really are no good ways to get a single accurate measurement of live snakes, we use a squeeze box because it is the least stressful method we know. A squeeze box is a home-made unit that consists of a piece of foam, a clear piece of Plexiglass the same size as the foam, and a piece of plastic or vinyl that is also the same size.
Above left : Gentle pressure on the plexiglass covering the snake allows the animal to remain calm, safe, and unharmed. Once under the glass, the spine is traced with a dry erase marker then the snake is released. Above right: The line is measured with a string, and the string is then measured with a meter stick.
The video shows how it is assembled and used and why the snakes remain calm, safe, and unharmed.
Video Snake Measuring:
A snake may be in the squeezebox for a minute or less. Simply place the snake between the Plexiglass and the covered foam and gently press down. The snake becomes immobilized without being harmed. Quickly use an erasable pen to draw a line on the Plexiglas from the head of the snake down the vertebral column to the tip of the tail. Then release the snake and return it to the cage. Take yarn or string and trace the line you just created, then measure the length of the yarn or string to get the measurement of the snake. In order to compare snake lengths, one must measure all of the snakes being compared using the same technique.
Venomous and Non-venomous
How can you tell if a snake is venomous by looking at it? (Ask a participant to write all the answers on the board). Some snakes have facial pits near the nostrils. These are the pit vipers. Other snakes, like the coral snake, have heads that look a lot like non-venomous snakes. (Dispelling myths about venomous snake “characteristics”?)
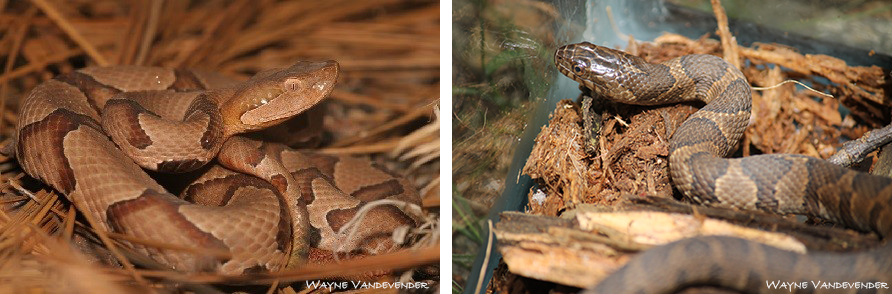
Venomous Copperhead, Agkistrodon contortrix and the non-venomous Northern Watersnake, Nerodia sipedon (right) are often confused.
Anyone know about what percentage of NC snakes are venomous? Of the 37 species of snakes in NC there are only 6 venomous snakes, which is about 16% meaning that 84% of our NC snake species are non-venomous. The six venomous snakes in NC include the Copperhead, Eastern Rattlesnake, Pygmy Rattlesnake, Timber Rattlesnake, Cottonmouth, and the Coral snake.
Do you die if you are bitten by a venomous snake in NC? Venomous snakes may inject some, all, or none of their venom when biting. When no venom is injected it is called a dry bite. It takes a large investment of energy to produce venom so when a snake strikes defensively rather than to acquire food, the venom is sometimes conserved. Most NC venomous snake bites are not fatal but all should be considered serious if any venom at all is injected. A bite from an Eastern Diamondback is an emergency, though the likelihood of encountering one of these snakes is extremely low. Most cottonmouth and copperhead bites are not fatal for humans.
Mole kingsnakes, corn snakes, and juvenile rat snakes are often mistaken for copperheads and killed. Look at coloration, shape of body, and shape of head to identify snakes. A good policy is to just leave them alone and admire and observe them from a distance.
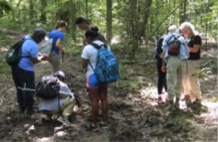
Students take time to admire and discuss the local ecosystem while conducting fieldwork.
We don’t really know how many species exist on the planet. Perhaps the number is nearly 10 million species, which means they have quadrillions of ecological interactions, and it takes all of these to make life as we know it possible. We don’t take a breath without the workings of the natural world—so should honor and respect and appreciate all forms of life and their roles in the great community of existence, including snakes. It is a mistake for us to think we can pick and choose which species deserve to live and which should be eliminated. In the words of the great thinker Aldo Leopold:
The last word in ignorance is the man who says of an animal or plant: “What good is it?” If the land mechanism as a whole is good, then every part is good, whether we understand it or not. If the biota, in the course of aeons, has built something we like but do not understand, then who but a fool would discard seemingly useless parts? To keep every cog and wheel is the first precaution of intelligent tinkering.
Reporting Data to The HERP Project & The Carolina Herp Atlas.
Through use of the free Herp Project android application, HRE participants record data and upload it to an open source database found here on the Herp Project website. This enables us to compare our data with previous years, and we can download data sets for further analysis. We also report our data to the Carolina Herp Atlas, a citizen science database initiated to document the distributions of amphibians and reptiles across North and South Carolina.

This project is supported by the National Science Foundation, Grant No. DRL-1114558. Any opinions, findings, and conclusions or recommendations expressed in this manuscript are those of the authors and do not necessarily reflect the views of the National Science Foundation.
Websites for Identifying Snakes
The Davidson College Herpetology Laboratory
http://www.herpsofnc.org/herps_of_NC/snakes/snakes.html
Savannah River Ecology Lab
http://srelherp.uga.edu/snakes/index.htm
The North Carolina Museum of Natural Sciences
Books, Field Guides, and Checklists
Beane at al., (2010). Amphibians & Reptiles of the Carolinas and Virginia (2d Ed. Revised) Chapel Hill, NC: UNC Press.
Beane, J. C., and A. L. Braswell. 2011. Checklist of the amphibians and reptiles of North Carolina. Available at: http://naturalsciences.org/research-collections/research-specialties/amphibiansreptiles
Gibbons, J. W. and M. E. Dorcas. 2005. Snakes of the Southeast. University of Georgia Press, Athens, GA.
Dorcas, M. E. 2004. A Guide to the Snakes of North Carolina. Davidson College – Herpetology Laboratory, Davidson, NC.
Visual Learning Software
VL HERPS is a free visual learning software program designed for learning reptiles and amphibians of the Southeast at home. http://theherpproject.uncg.edu/visual-learning-software/
Other
Gibbons, J.W. and M.E. Dorcas. 2014. What is a herpetologist and how can I become one? Journal of North American Herpetology 1:1-2
Transcript Picking Up a Snake for the First Time:
Courtney – Ok, so, picking up a snake for the first time is a little different than being handed one because they’re not quite as ready for it. We do have a couple of snakes here, they’re in tubs so there’s the whole lid removal thing to deal with, they can try to come out when you take the lid off so you have to be ready for it. I’m here to help but, you’re gonna, you’re gonna do it.
Well, this is a hatchling water snake. They can be a little snappier, this one has not been so that’s an option if you want to. Or if you want to be a little on the safer side this is a worm snake, they have those teeny little mouths that we talked about so it can’t really bite you even if it wanted to and they just don’t. And then we have a ring neck snake which is my favorite. He’s a little wigglier but they’re not really bitey. So, we have like three levels here.
Participant – I’m gonna go for the ring neck. (Points at large aquarium)
Courtney – You wanna go for the ring neck? (Picks up aquarium) Ok, so, we’ve got the paper and he is all curled up which can be a defensive position but we’re just going to, like you said, show him your hand and then let him, and then pick him up away from the head. And you’re just going to support as much of the body as you can and he’s tiny so that’s most of him. (Participant reaches in aquarium and picks up snake)
And these you have to grip them a teeny bit so that they don’t wiggle away from you but you’re not going to squeeze or put very much pressure. Perfect.
See once they chill a little bit they’ll get used to you and start kinda holdin on. They’re like, “Fine, if I have to be here, I’ll just stay.” Yay.
Ann (off camera) – Can you put him back now?
Courtney – (participant leans over aquarium to lower snake back into it) Now you just gently let him go and he’ll usually go hide by himself so you don’t have to do much. But in the tubs, sometimes they do try to shoot out so you’re ready with the lid.
Transcript Picking up a Snake from a Box:
Courtney – See his tongue wiggling a little bit? He’s probably just going to bump into you more than anything, his mouth may or may not be open… does that make sense?
Participant – Yeah.
Courtney – So, it’s not traumatizing, I promise, it happens all the time. But you just casually reach in, grab it, and then you have it. (Participant reaches in the box and grabs the snake) Perfect… perfect! You support the body, there you go! (snake begins to wiggle out of participant’s hands) Oh, now he’s wigglin out, make sure you have his head, perfect.
And there’s some loveliness that he dropped for you.
Participant – He did?
Courtney – Yeah, he just went to the bathroom.
Transcript Picking Up an Adult Snake from an Aquarium:
Ann – The first thing you want to do is you want the snake to know you’re there, you don’t wanna surprise it. So one of the things I usually do it I let the snake see my hand, and then I’m gonna come towards about halfway or a third of the way toward the head and then pick it up. Sometimes it’s helpful, with this snake, is just to pick it all up as a glob, ok? So you’re going to let the snake see you.
Now, let’s talk about one other things, I know you know this but not everybody else does. Alright now sometimes you freak the snake out when you do that and snake jerks. What are you going to do then?
Participants – Stay calm.
Ann – You’re going to stay calm. You’re gonna stay calm. And you’re going to just be calm because if you’re calm, there’s a better chance. Now, say the snake bites you, what do you do?
Participant – Stay calm.
Ann – Stay calm. You don’t want to jerk your hand away. So, any snake can bite, not all snakes will bite. This snake has never bitten anyone, it doesn’t mean that it won’t; it could. Alright? We’ve got a brave volunteer here and we’re going to let him take the snake out.
(Participant reaches in the aquarium) Notice how he lets the snake see him, you know the snake has seen him because it’s moving, it’s looking at him. Has it tongue-flicked yet?
Participant – Yeah.
Ann – Yes, it’s tongue-flicking so that means it’s trying to figure out what’s going on in the world. Now it’s taking its tongue and putting it in openings in its mouth and it’s taking air to an organ. What’s the name of that organ?
Participants – Jacobsen Organ
Ann – Jacobson’s Organ, good! Alright, now let’s move it over…
Transcript Snake Measuring:
Courtney – There’s not good way to go down the entire snake without stretching her out which can hurt her cause if you stretch her out too much, it’s kinda like stretching you out. You don’t necessarily know you’re doing it and she’s gonna kind of fight because she doesn’t know what’s going on. So the easiest way to get a length on a snake is by using what we call a squeezebox.
Now we have squishy goodness down here, so we’re not going to hurt her. Something to go over it because she’s probably going to make a mess, cause they do that. And then we have the plexiglass which we’re going to draw on. So if you want to, put her down, and try to put her down so that she’s not overlapping, if possible cause we don’t want to squish her. And watch where her head goes cause she’ll latch onto the table. (Participant places the snake on the covered foam and it begins to wiggle away)
Ann (off screen) – I think he may need some help, somebody jump in and help him.
Courtney – Perfect. Good job! (Places the plexiglass over the snake) Put a little light pressure, you don’t have to put a lot and we’re squishing her down into a pad so it’s pretty safe for her. It just makes her feel nice and secure. (Participant steps up with a marker and begins to draw on the plexiglass) And we are going to draw a line all the way down her vertebral column all the way from the tip of the nose to the tip of the tail getting every curve… Which you are doing beautifully. (Participant continues to trace the snake) And you have that long skinny tail all the way to the tip of it. (Participant finishes the line)
Ann (off screen) – Nice!
Courtney – (lifts the plexiglass a little and holds snake) And now we have the outline of the snake so we can let her go. Somebody ready? (Lifts plexiglass all the way off) Got her? (Participants pick up snake again) So if this were a wild snake and we weren’t too worried about taking multiple measurements, she could just go. And so she’s free to go, she’s not scared anymore, and we have her outline to do what we need to do.
(Cut to plexiglass laying on table with snake outline)
Courtney – Step two, we’re going to trace the string along this backbone, so we can get a measurement. We’re going to do it very carefully and as accurately as possible, maybe needing a partner. You want to partner up? (Participants lay string along the line on the plexiglass)
And again, we don’t want to stretch the snake out too much because they have all those synovial joints and we don’t want to stretch them too much. And it’s hard to get an accurate reading on them when they can flex that many joints. There’s a lot of variability there.
Participant – It’s not long enough.
Courtney – So we’ll just hold a finger on the exact point where it was and now we don’t need to hold the string on where the head was anymore. So we can let that go and just start over at this point. Does that make sense? (Participants move the string) Start from my finger and go down.
Participant – This way?
Courtney – (Turns string around for participants) There you go. And then go toward the tail like you were. (Participants finish the measurement) Perfect. So now we know we have one full length of string and then that much.
Lacey – See his scales, ok. This guy does have some spikes (motions to sides of lizard) so we gotta be careful how we hold him. He doesn’t mean to hurt you but, you know, they do poke. Ok, he has what?
Participant – Sharp claws
Lacey – So do you guys notice the claws? That’s another characteristic, ok? (Points to back feet) Notice anything else?
Participant – He’s tiny but his skin is really big and hanging off. (Motions around his own neck.)
Lacey – (Laughs) Ok.
Appendix A: The HERP Project Snake Datasheet
for wild caught snakes or to be used as practice with captive snakes
Snake Species: _____________ Scientific Name: ____________________________________________
Confidence Level of species ID 1-4 (1 = certain. 2 = not positive, 3 = guessing) _____
Scribe :_______________________________________ Status: Alive Dead Recap? Y N U
Date (mm/dd/yyyy):___________ Day of week:______ Time:_______ am or pm
Observers: ___________________________________________________________________________
Coordinates (UTM) (WGS 84, Zone 17): __________________________, _________________________
Habitat (1-10):_______ Microhabitat (under a rock/coverboard, in a stump hole, rocks near dam
of lake, etc.) __________________________________________________________________________
Capture Method (1-17):___ Weight (g):_____ Sex: F M U Gravid: Y N Unknown N/A
Life Stage: Egg Hatchling Sm. Juvenile Lg. Juvenile Adult Unknown
Photo Record? Y N Total Length measured by stretch method (mm):_________________________
Days since last rain:_____ Air Temp: F C Relative humidity:
Sky Code (0-6):_____ Wind Code (1-4): ______ Date reported to CHA (Carolina Herp Atlas): _________
Location Description (Where in camp was the animal located?): _________________________________
_____________________________________________________________________________________
Estimate of total length ______ feet/inches or mm Name of estimator: ________________________
Injuries/defects/parasites (include sketch if possible): _____________________________________________________________________________________
Notes (what was the animal doing when you found it/behavior, etc.): _____________________________________________________________________________________
_____________________________________________________________________________________
Habitat codes: 1 = Road; 2 = Edge of field or forest; 3 = Field; 4 = Pine/hardwood forest; 5 = Stream or stream bank; 6 = Open wetland; 7 = Forested wetland; 8 = Lake; 9 = Riparian; 10= Other
Capture Method codes: 1 = Road; 2 = Visual search did not handle; 3 = Visual search hand capture; 4 = Coverboard plywood; 5 = Coverboard tin; 6 = Other
Sky Codes: 0 = Few clouds; 1 = Partly cloudy (scattered) or variable sky; 2 = Cloudy or overcast; 4 = Fog or smoke; 5 = Drizzle or light rain; 6 =rain
Wind Codes: 0 = Calm (< 1 mph); 1 = Light Air (1-3 mph); 2 = Light Breeze (4-7 mph), leaves rustle, can feel wind on face; 3 = Gentle Breeze (8 – 12 mph), leaves & twigs move around, small flag extends, 4 = Strong wind (more than 12 mph)
cloudy (scattered) or variable sky; 2 = Cloudy or overcast; 4 = Fog or smoke; 5 = Drizzle or light rain; 6 =rain